publisher widgets

Global Options

What is “Global Options” for Publisher Widgets?

When you activate different widgets, you see some options that are the same through nearly all the widgets. Global Options of widgets refers to them. Publisher Custom Widgets fully covers activating widgets, read that to know how to add widgets. In this section we want to describe these options. As mentioned above, there is another section about adding widgets and we dodge this topic here, just as an example, open a widget setting panel to see its Global Options and learn more about them one by one.

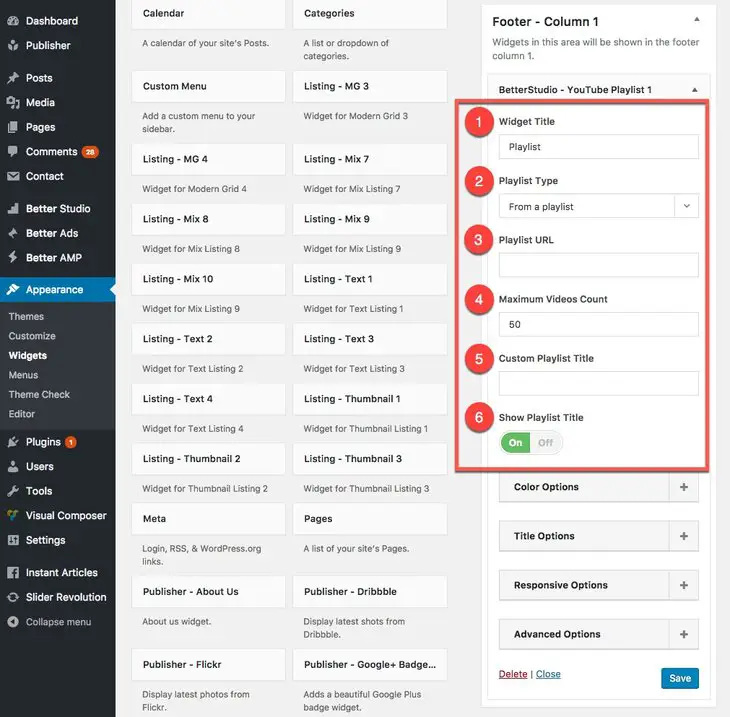
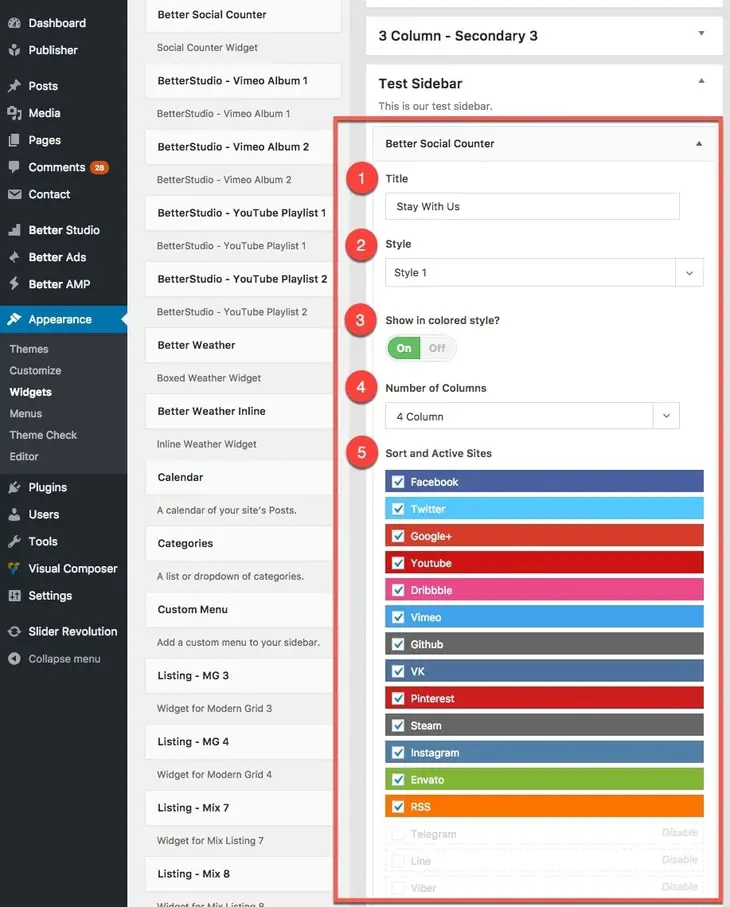
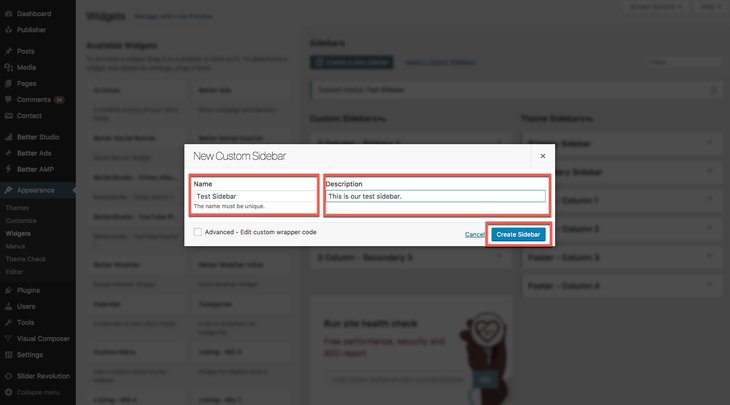
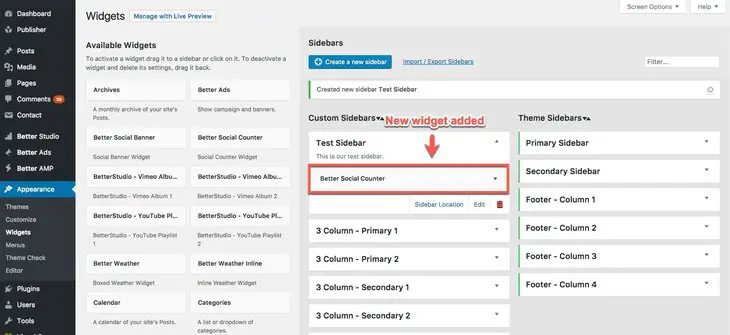
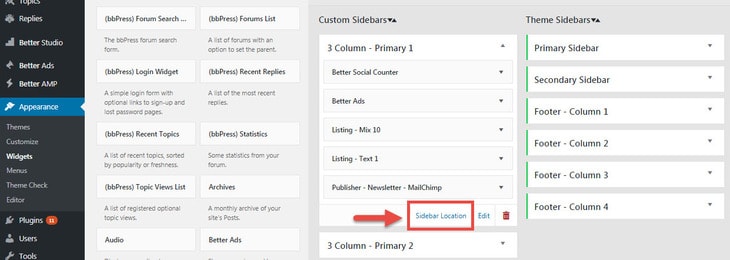
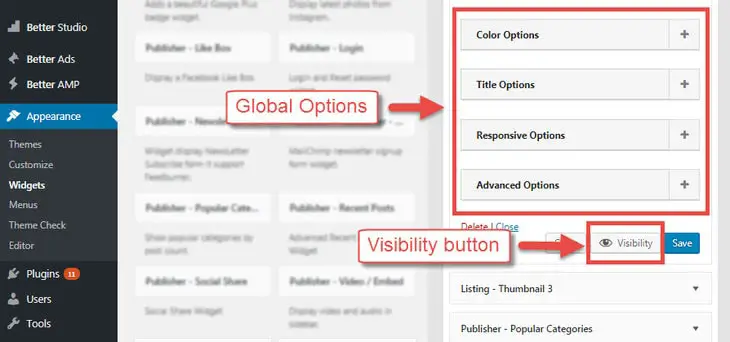
Go to Appearance → Widgets, select one of the Publisher custom widgets. Global Options marked by red rectangular in below image.

Global Options of widgets in Publisher

A- Color Options

Color Options in Global Options of plugins in Publisher

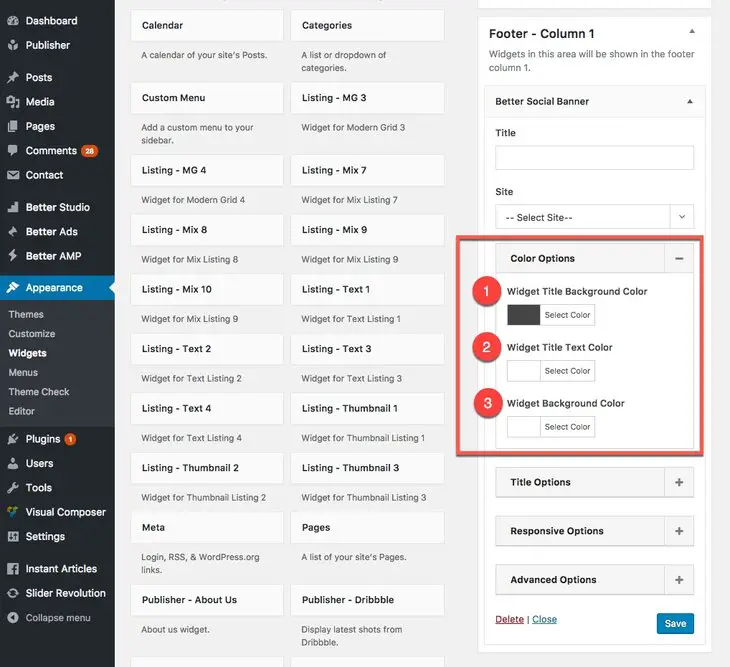
1- Widget Title Background Color: Color of top line of the widget.

2- Widget Title Text Color: Color of title font. When it is blank, automatically uses Widget Title Background Color.

3- Widget Background Color: Color of whole widget background.

B- Title Options

title options in widgets

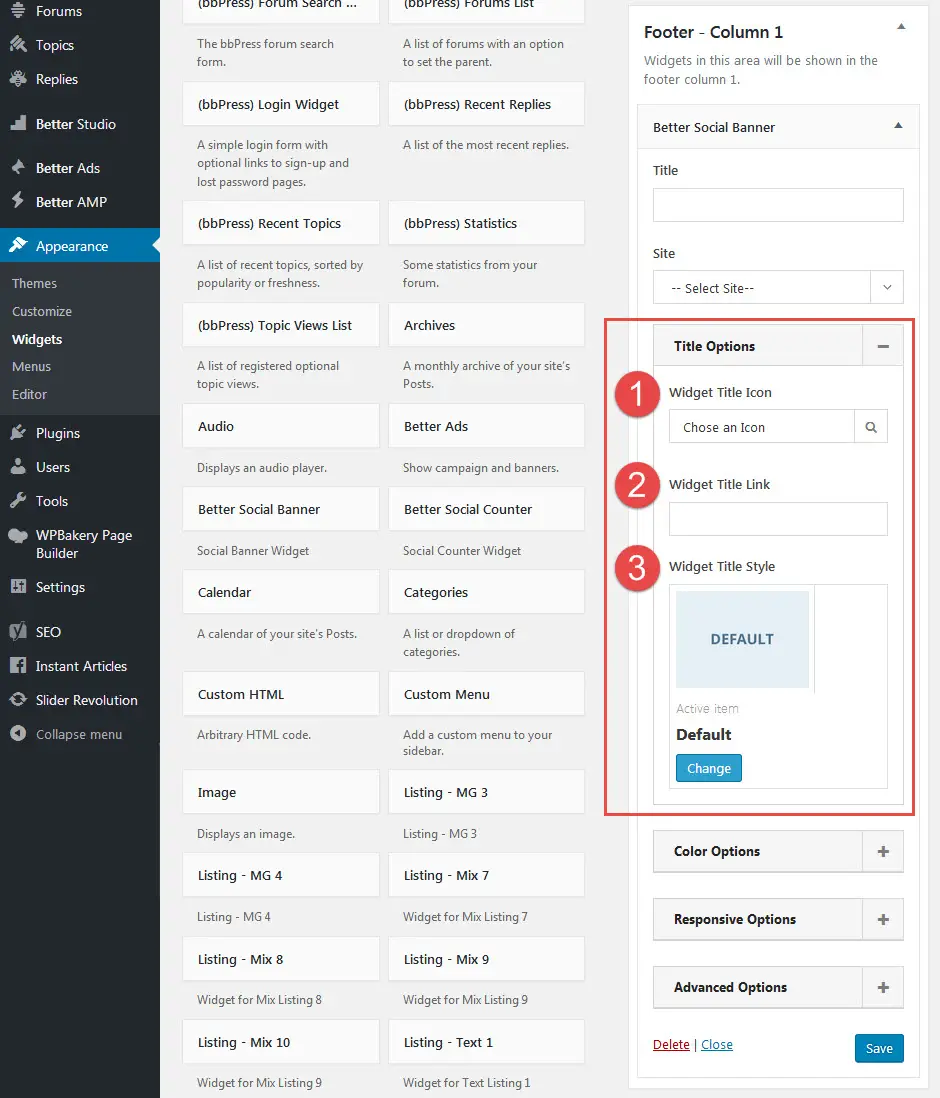
1- Widget Title Icon: Click on magnifier icon and select an icon for widget title among hundreds of Font Awesome Icons.

2- Widget Title Link: Create a hyperlink for widget title. Paste the address you want in this format: http://www.betterstudio.com

3- Widget Title Style: Select style of widget heading. It overrides default heading style selected in theme options.

C- Responsive Options

Responsive Options in Global Options in Publisher

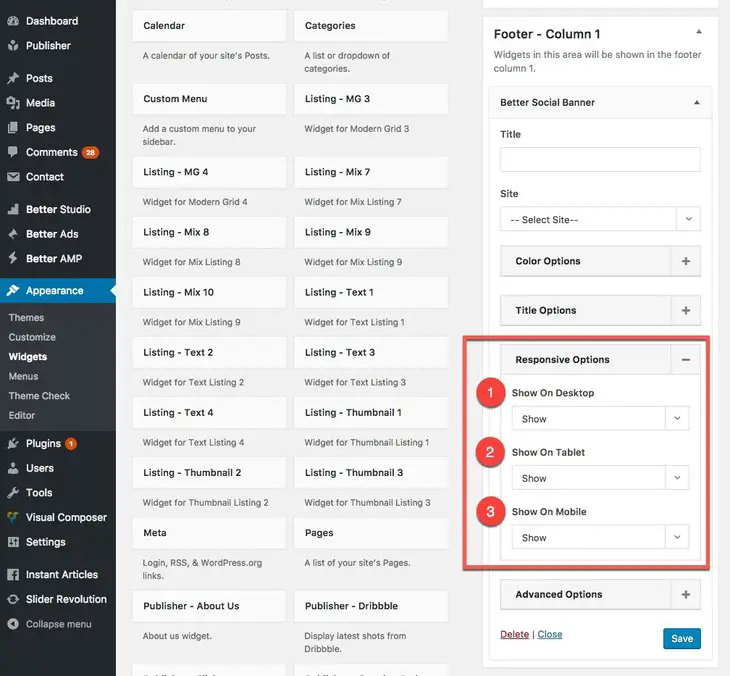
1- Show on Desktop: Show/hide this widget on desktop computers.

2- Show on Tablet: Show/hide this widget on Tablets.

3- Show on Mobile: Show/hide this widget on Mobile Phones.

D- Advanced Options

Advanced Options in Global Options in Publisher

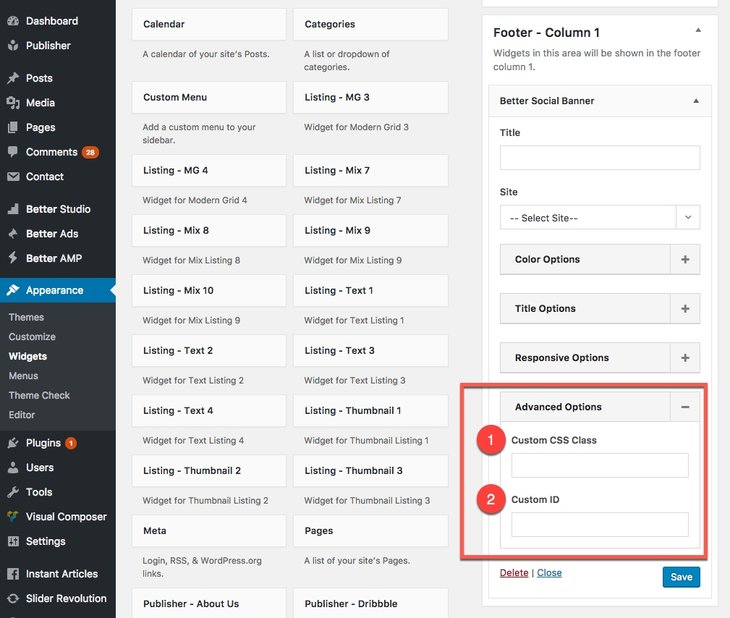
1- Custom CSS Class: Add a class (or some classes) to this widget then you can assign custom CSS to it.

2- Custom ID: Add an ID to this widget then you can assign custom CSS to it.

Playlist Widget

What is Playlist Widget?

Let’s say you want to share YouTube/Vimeo videos or a YouTube Playlist/Vimeo Alubm in your sidebar. Playlist Widget will do the job for you and show these videos in a very stylish forms. Publisher has two widgets for handling YouTube videos, and two widgets for Vimeo videos. See demos of Playlist widgets in Publisher Custom Widgets.

Add New Playlist Widget

Creating a new sidebar and adding a new widget is covered in Custom Sidebars section. Read it to create sidebars and manage your widgets.

Playlist Widgets Option

There are two types of option for every widget: Global and Exclusive. Read widget Global Options and here we are going to talk about exclusive options of Playlist widgets.

There are two Playlist widgets for YouTube. Their options are the same, difference is in their style. The same thing is true for Vimeo two widgets.

YouTube Playlist Widgets

Ok, this is how BetterStudio – YouTube Playlist 1 options look like.

YouTube playlist widget option in Publisher

1- Widget Title: Enter a title for widget. Leave it blank, no title on the widget.

2- Playlist Type: Select how you want to enter videos: a whole YouTube Playlist or separate videos. If you select From a Playlist, you see options number 3 and 4. If you select Custom Video Links, you will see another field named Playlist Videos List. Enter your custom videos share URL from YouTube in there, just one link in every line.

3- Playlist URL: Enter YouTube Playlist share URL address here. This option exists only if you selected From a playlist in option number 2.

4- Maximum Videos Count: Limit the number of videos showing in the widget from a YouTube playlist. This option exists only if From a playlist is selected in option number 2.

5- Custom Playlist Title: Select a title for your playlist. Leave it blank, default title of YouTube Playlist will show up.

6- Show Playlist Title: Show/hide playlist title.

Vimeo Playlist Widgets

Now we add BetterStudio – Vimeo Album 1 and describe its options.

Vimeo Playlist widget exclusive options in Publisher

1- Widget Title: Enter a title for widget. Leave it blank, no title on the widget.

2- Playlist Type: Select here how you want to enter videos: a whole Vimeo Album or separate videos. If you select Vimeo Album, you see options number 3 and 4. If you select Custom Video Links, you will see another field named Custom Video Links. Enter your custom Vimeo share URL in there, just one link in every line.

3- Album URL: Enter Vimeo Album share URL address here. This option exists only if Vimeo Album is selected in option number 2.

4- Maximum Videos Count: Limit the number of videos showing in the widget from a Vimeo Album. This option exists only if Vimeo Album is selected in option number 2.

5- Album Title: Select a title for your album. Leave it blank, default title of Vimeo Album will show up.

6- Show Album Title: Show/hide album title.

Weather Widget

What is Better Weather Widget?

Better Weather is a gorgeous weather plugin. It has two wealthy WordPress local weather widget (also Visual Composer add-ons) with extremely smart responsive design! Merely put it anywhere with any width on your web site and magic happens! This is a premium plugin available for buying on Codecanyon. It is contained in Publisher package for free.

To know more about Better Weather and see its beautiful styles, see Better Weather plugin demo. Also you can see widgets demo.

Features like:

  • Beautiful and customizable images
  • Gorgeous animations
  • Simultaneously support of four different forecasters
  • Detect visitor IP and display local weather
  • Two widgets
  • Visual Composer add-on

and many other features make Better Weather lovely and best option for your website forecasting plugin. Now we want to talk about its two widgets.

Activate Better Weather Widget?

Custom Sidebars section fully covers activating a widget in a sidebar; we don’t reinvent the wheel and ask you to read that section for activating Better Weather widget (or widgets). After activating this widget, there are two types of option for it:

  1. Global Options
  2. Exclusive Options

Read more about Global Options in its dedicated section. Here we talk about Exclusive Options for Better Weather widgets.

Exclusive Options of Better Weather Widgets

Go to Appearance → Widgets, here you see two widgets for Better Weather.

Two Better Weather widget in Publisher

First we add Better Weather and describe its options.

Exclusive options of Better Weather widget in Publisher

1- Title: Select a title for widget. Leave it blank, no title will be shown.

2- Location: Enter “latitude and longitude” of the location you want to display its weather. Read How to find location value?

3- Custom Location Name: Enter name of the location that you are displaying its weather.

4- Show Location Name: Show/hide location name.

5- Show Date? Show/hide date.

6- Widget Style: There are two styles available: Modern & Normal style.

7- Show Next 4 Days Forecast!? Show weather forecast for next four days to your visitors.

8- Background Style: There are two background available: Natural Photo & Static Color.

9- Background Color: Select a color for widget background.

10- Icons Style: Two styles for icons are available: Animated & Static icon.

11- Font Color: Change widget font color.

12- Temperature Unit: Select Celsius or Fahrenheit temperature unit.

13- Show Temperature Unit? Show-hide temperature unit.

14- Show Visitors Location Status!? Show weather according location of your visitors. For more information see here.

Now we add second widget, Better Weather Inline, and describe its options.

Better Weather Inline widget in Publisher

1- Title: Select a title for widget. Leave it blank, no title will be shown.

2- Location: Enter “latitude and longitude” of the location you want to display its weather. Read How to find location value?

3- Widget Size: Select between three different sizes: Large, Medium and Small.

4- Icons Style: Two styles for icons are available: Animated & Static icon.

5- Font Color: Change widget font color.

6- Temperature Unit: Select Celsius or Fahrenheit temperature unit.

7- Show Temperature Unit? Show-hide temperature unit.

8- Show Visitors Location Status!? Show weather according location of your visitors. For more information see here.

Social Counter Widget

What is Social Counter Widget?

When you install and activate Better Social Counter plugin on your website, one new widget, Social Counter, will be added to your widgets. But what this widget does? It shows number of followers (likes, subscribers or whatever it’s called) of your social networks.

Social Counter Widget Activation

Publisher Custom Widgets fully covers selecting widgets of a sidebar, read that to know how you can add this widget. After adding the widget, you see widget settings like below.

Better Social Counter widget setting in Publisher

1- Title: Show a title for this widget. Leave it blank to write nothing on the top of the widget.

2- Style: Select between 11 different styles! See some of Better Social Counter styles.

3- Show in Colored Style? Show icons in Black and white or show them colorful.

4- Number of Columns: Select between 1 to 4 columns.

5- Sort and Active Sites: Select which icons you want to display and arrange their location. Check/uncheck to select/deselect them. Change positions by drag and drop.

Don’t forget to click Save after you made changes.

Add and Manage Social Network Accounts

Option number 5 (see above) gives you the ability to manage your social networks location and showing in the widget; but where these accounts are created and you can enter your information? For adding new account and manage current ones, go to Better Studio → Social Counter, here you can see a long list of different networks, channels, etc, and also some options. Every website you select, has its own configuration, some of them just need a URL, some of them need an API key. In the case of API key necessity, there is a short instruction at the same page.

Add Better Social Counter accounts in Publisher

Enter Page ID/Name: Enter ID/Name of the network/channel (depends on the case).

Widget Translation: Translate English words into your language.

List Of Networks/Channels: Click on every network/channel name to see its options.

Scroll down the page, you see these:

Better Social Counter more options in Publisher

RSS: Display the number of RSS subscribers.

Posts: Display the number of website posts.

Comments: Display the number of website comments.

Members: Display the number of website members.

Typography: Change the typography of Better Social Count widget. Read more about Typography.

Caching Options: Set the maximum time of caching information. For example, every 2 two hours it checks for number of followers, likes, etc, and update previous number.

Backup & Restore: Create/restore a backup of Better Social Count plugin.

Click Save Options after whatever changes you have made.

Custom Sidebars

When we talk about custom sidebars, it has two meanings:

  1. Add custom sidebars to Publisher theme.
  2. “Custom Sidebars” plugin for customizing post pages sidebars.

You can create as many as custom sidebars you want in Publisher and use them in different pages.

“Custom Sidebars” plugin is fully compatible with Publisher. Its task is to customize sidebars appearing on every single post you want (any post type – read more about post types post types).

Now we first describe how to create custom sidebars in Publisher then describe how to manage sidebars in different pages by “Visual Composer” and “Custom Sidebars” plugins.

How to Create Custom Sidebar?

Make sure Custom Sidebar plugin is activated on your website. First of all you should create a sidebar. But how? in this part we teach you how to create a sidebar and in the next part we introduce Publisher exclusive widgets.

Go to Appearance → Widgets.

Custom sidebars page in Publisher

First we describe what you will find here:

  1. Available Widgets: These are widgets you can select for your sidebar. There are 35 exclusive widgets for Publisher.
  2. Create a new sidebar: Use this button to create a new sidebar (we will describe it).
  3. Import/Export Sidebars: You can take a backup of your sidebars or restore backups created before.
  4. Custom Sidebars: These are sidebars made by user, could be deleted or add more of them.
  5. Theme Sidebars: These are default sidebars of Publisher. It’s obvious where they belong to. Primary sidebar is used in 2 column layout and both Primary Sidebar & Secondary Sidebar are used in 3 column layout (Read more about layouts).  There are four widget locations in footer (Read more about footer options).

Ok get back to create a new sidebar.

1- Click on Create a new sidebar (see above image).

2- Enter a name for sidebar in Name field. Enter a description in Description field.

Enter a name and description for sidebar in Publisher

Finish it by clicking on Create Sidebar. Now you have a new empty sidebar.

In above image you see a checkbox, Advanced – Edit custom wrapper code, it’s advanced options for sidebar. If you don’t have enough information about it, just leave it. Let’s check this checkbox:

Advanced options for creating sidebar in Publisher

Before-after title-widget properties define the HTML code that will wrap the widgets and their titles in the sidebars. More info about custom wrapper code. Do not use these fields if you are not sure what they do, it can break the design of your site. Leave these fields blank to use the theme sidebars design.

How to Add a New Widget to Sidebar

We created a new sidebar in above and will use it here, but the procedure is the same for all new or existing sidebars also for Custom and Primary sidebars.

1- Now you should add widget(s) to your empty sidebar. On the left-side you see the list of available widgets; 35 exclusive widgets for Publisher. Click on the widget you want.

Select a sidebar for widget in Publisher

A list of all sidebars will show up. Select the sidebar you want to add this widget to. Click Add Widget.

2- Now your widget is added. Open its accordion menu and customize it.

A new widget added to new sidebar in Publisher

Publisher Exclusive Widgets

As mentioned above, Publisher has 35 exclusive widgets, use them in Custom and Primary Sidebars or use them by Visual Composer. If you want to display weather or your social count or show special posts in various layouts and styles, probably there is an option (or options) suits your need. Because they are too many, we dedicated a section to Publisher Custom Widgets for introducing and describing them.

How to Use “Custom Sidebars” Plugin?

First of all go to Publisher → Plugins and install Custom Sidebars (if you didn’t install it before). After that you have created custom sidebars or organized your primary ones, you can select which sidebar to show up in different sidebar locations in Publisher. There are 6 locations you can select from:

Primary Sidebar: Shown when at least 2 column layout with sidebar show selected (read more about column layout)

Secondary Sidebar: Shown when 3 column layout with two sidebar show selected

Footer – Column1 & 2 & 3 & 4: Shown in Footer widget locations (Read more about footer options).

Now make sure your Custom Sidebars plugin is active and updated to the latest version, then stay with us; we are going to describe the procedure of using this plugin step by step:

For Any Post Type:

1- Edit the post you want to customize its sidebars. All post types are included i.e post, page, attachment, etc.

2- On the right-hand-side of the editing page you see Custom Sidebars meta box.

Use Custom Sidebars plugin in Publisher

Six locations of Publisher sidebars are shown, but remember displaying sidebars depends on which layout and setting you use for your site (or overridden settings for this post).

3- Below the sidebar location you want to change its content, click on drop down menu.

Select a sidebar for custom sidebar in Publisher

4- You see a full list of Custom and Primary sidebars in Publisher. Select the sidebar you want. You’re done and this sidebar location is customized (do not forget to update the post). Do the same procedure for every sidebar location you want.

For Any Archive Page:

1- Go to Appearance → Widgets

2- Go to sidebar you want to use in particular archive page. At the bottom of its accordion, click on Sidebar Location

Change sidebar location

3- Open For Archives accordion. Here you select an archive page for displaying this sidebar.

Show sidebar in archive pages

Change Widget Visibility

You can set roles for showing one widget; for example show it just in specific pages or for specific users. To do this, when Custom Sidebar plugin is active, you see a button below Global Options, Visibility.

Change visibility of widget in sidebar

Click on it and add a new rule to it. You see it is possible to show this widget for specific roles, specific pages, post types and taxonomies.

change visibility of a widget