ads

How to Show Ads in Ad Location

After creating Banner & Campaigns, using them is straightforward. When you want to add and show Ads in different Ad locations, the procedure is nearly the same. Here we describe an example for using a Banner/campaign in “After Header” location and the same procedure for all other locations.

AMP theme has its own Ad locations; for example “Header Ads” are not showing in AMP theme, you can find AMP Ad locations under AMP Ads tab in below image. Also it just shows AMP format Ads. Read How to Create Banner for more information about Ad format.

How to Add a Banner Ad

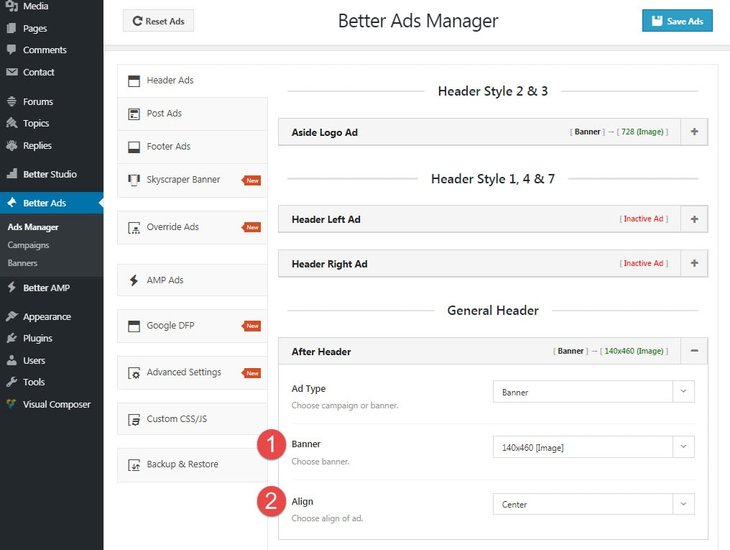
If you have read Ad Locations you know how to find “After Header” location, go there and click on + in front of After Header to open its accordion. Select Banner in Ad Type field.

Show Ads in Ad locations

1- Banner: Select one of the banners you created before. If didn’t create any, read How to Create Banner.

2- Align: Choose align of Ad. Available options are:

  • Left
  • Center
  • Right

How to Add a Campaign Ad

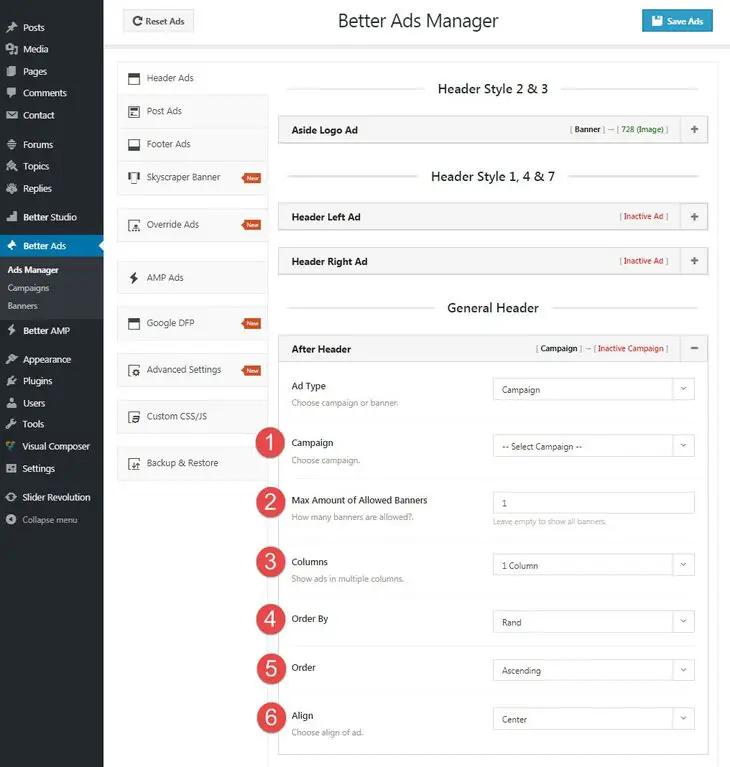
If you have read Ad Locations you know how to find “After Header” location, go there and click on + in front of After Header to open its accordion. Select Campaign in Ad Type field.

Now a list of options will appear. We describe them one by one.

Ad Campaign options in Better Ads Manger

1- Campaign: Select one of campaigns you have created before. If you didn’t create one, read How to Create Campaign.

2- Max Amount of Allowed Banners: You can add as many as Ads you want to one banner but you can select how many of them display to visitors. Leave it empty to show all the banners in selected campaign.

3- Columns: Show Ads in 1, 2 or 3 columns.

4- Order By: Select an order for displaying campaign Ads. Available options are:

  • Date
  • Title
  • Random

5- Order: Select an order for displaying Ads. For example you selected Order By: Date, now choose to show Ads in the sequence they have added or in reverse order. Available options are:

  • Ascending
  • Descending

6- Align: Choose align of Ad. Available options are:

  • Left
  • Center
  • Right

Override Ads

What is “Ad Override”?

Let’s say you selected one of your banners to display in one Ad Location such as Header Logo Aside. Now you want to hide it in one specific page or add/show another Ad or even change its setting; how can you handle this? Better Ads Manager made it very simple to override Ads. When you edit every post, page, category, etc, you see Better Ads Manager option panel at bottom of the page. Here you can simply show/hide/change Ads in every Ad location of current page.

How to Override Ads?

Edit the intended page, post, category, etc, scroll down the page, you see an accordion menu labeled Better Ads Manager.

How Can you Show/Hide Ads?

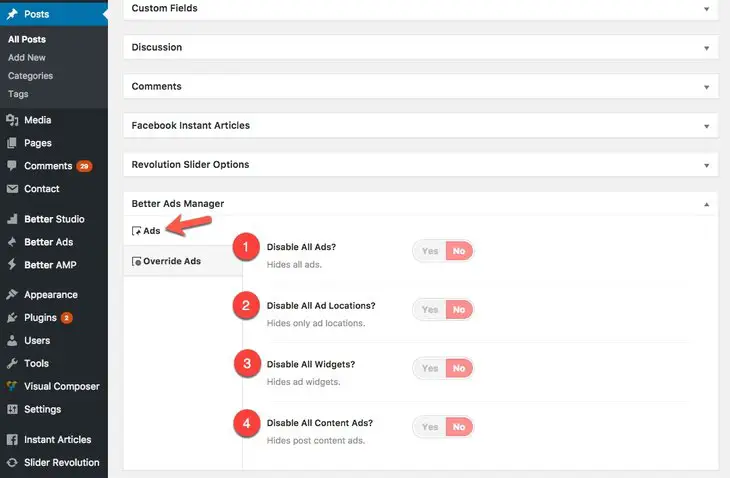
Look at picture below, in Ads tab, there are items which allow you to disable Ads.

Disable Ads as override in Better Ads Manager

1- Disable All Ads? Hide all Ads in this page.

2- Disable All Ad Locations? Hide Ads in Ad locations (i.e Header & Footer Ads).

3- Disable All Widgets? Hide only Better Ads widgets.

4- Disable All Content Ads? Hide only Ads among post content.

How Can You Override Ads?

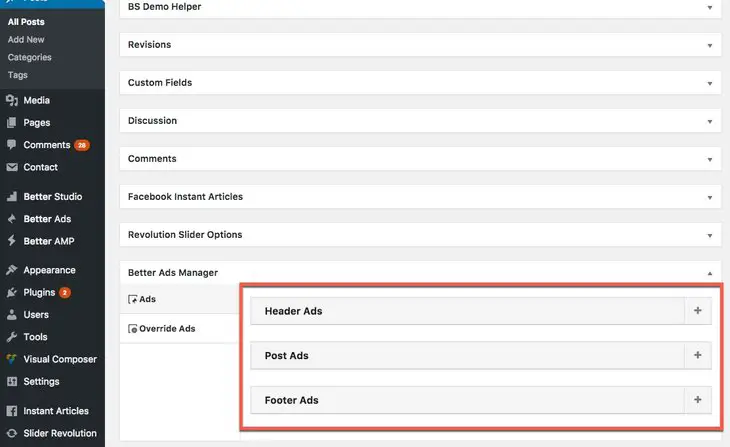
There is another tab in Better Ads Manger meta box, Override Ads, and the main overridden action is in this tab.

Overriding Better Ads Manager options

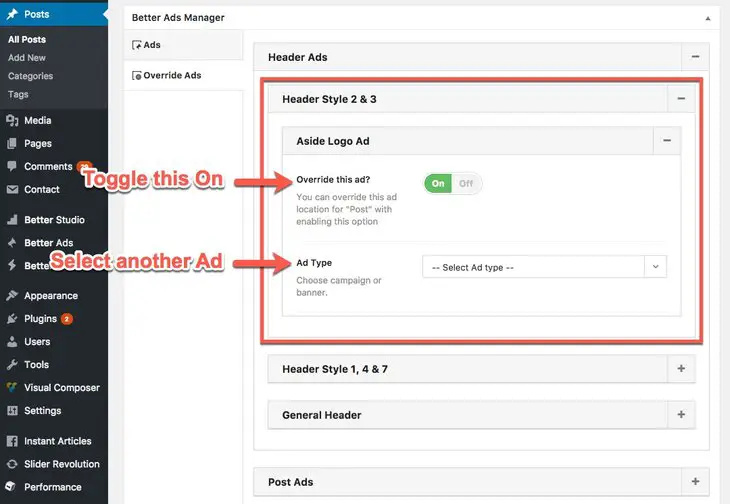
You see it’s possible to only override Ads in Header & Footer & Post content (all Ad Locations) and widget Ads cannot be overridden from here. Find the Ad Location you want to override.

override Ads in Better Ads Manager

Toggle Override this on? to On and remaining is exactly the same as How to Show Ads in Ad Location.

For overriding widget Ads, use Custom Sidebars plugin and customize sidebars for the page.

How to Show Ads in Widgets

Better Ads Manager plugin has a widget for sidebars and an add-on for Visual Composer to show Ads in various locations. In this section we describe them in turn.

Show Ads in Widget

We discussed about How to Show Ad in Ad Location. Now we just need to find Ad widget, add it to a sidebar and use a Banner or Campaign for showing Ads. We introduced all Publisher exclusive widgets and also creating Sidebar & adding widgets to it, so we just take a glimpse at it.

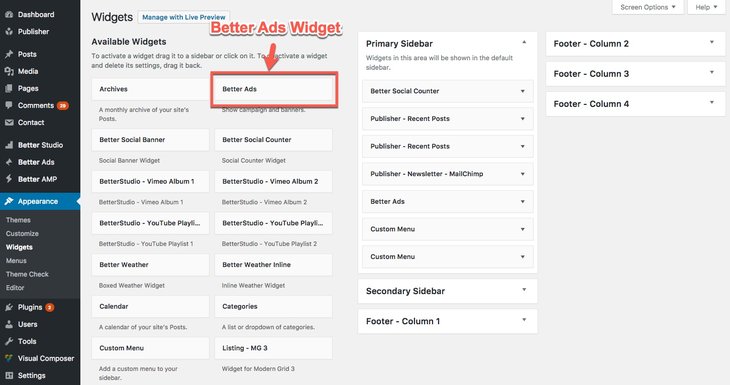
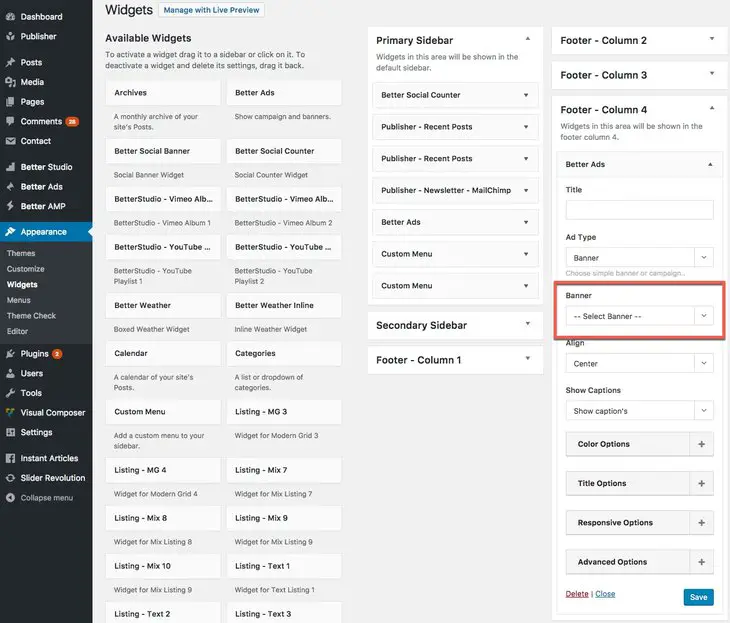
Ok for adding Better Ads Widget go to Appearance → Widgets, here you see the list of all widgets on the left-side of page.

Find Better Ads widget in WordPress

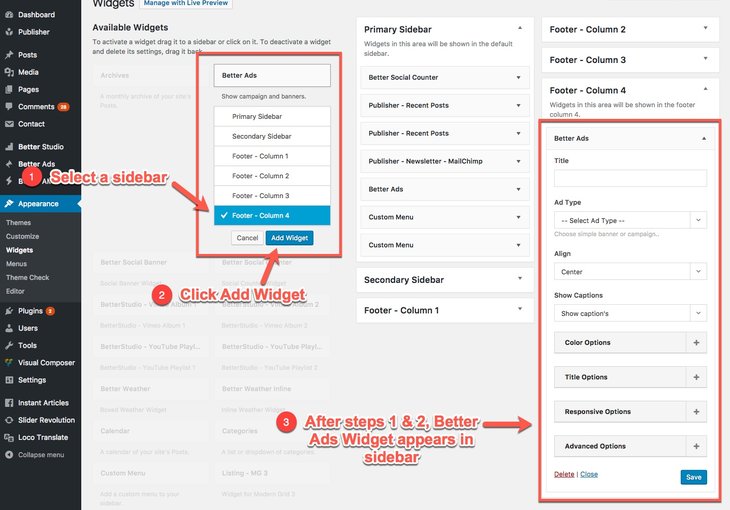
Click on Better Ads widget, you see a list of sidebars. Select the sidebar you want and click Add Widget. Now Better Ads Widget is added to selected sidebar.

Show Ads in Better Ads Widget

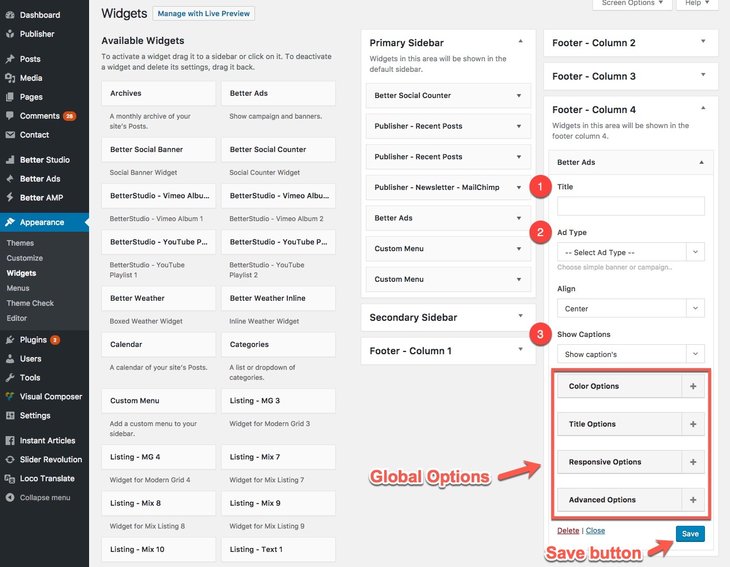
Like other widgets, Better Ads Widget has Exclusive Options & Global Options. Here we describe exclusive options of this widget.

Better Ads Widget exclusive Options

1- Title: Write a title for this widget. Leave it blank to display no title.

2- Ad Type: Select banner or campaign for displaying Ad. By selecting either of them, following options will be different. We describe each of them in details after this part.

3- Show Captions: If you have entered a caption for the Ad you are displaying now, show/hide it in this widget by this option.

When you are done, click Save button and enjoy your Ad Widget.

How to Add a Banner Ad

When you are selecting Banner in Ad Type, just one option will be added to current ones.

Add Banner Ad to widget in Better Ads Manager

Click on it and you will see a full list of banners (Normal Ad type), select one of them.

How to Add a Campaign Ad

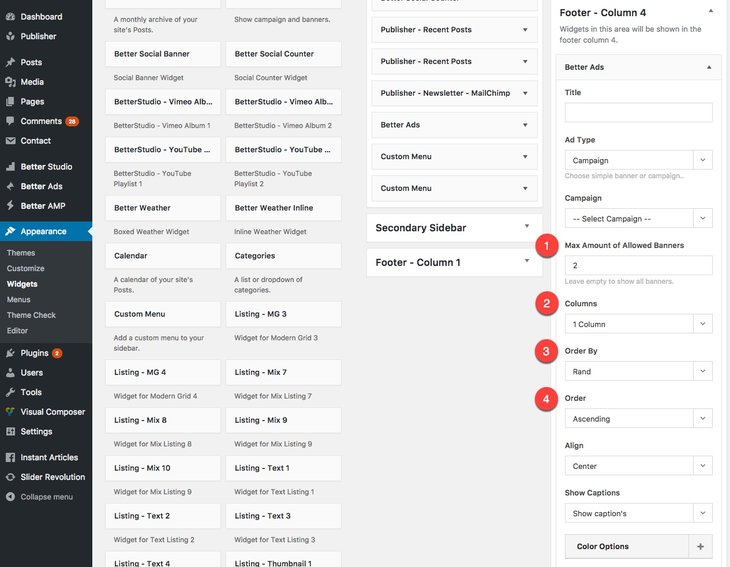
When you select Campaign in Ad Type, four options will be added to current ones.

Add Campaign Ad to Widget in Better Ads Manager

1- Max Amount of Allowed Banners: You can add as many as Ads you want to one campaign but you can select how many of them display to visitors. Leave it empty to show all the banners in selected campaign.

2- Columns: Show Ads in 1, 2 or 3 columns.

3- Order By: Select an order for displaying campaign Ads. Available options are:

  • Date
  • Title
  • Random

4- Order: Select an order for displaying Ads. For example you selected Order By: Date, now choose to show Ads in sequence they have added or in reverse order. Available options are:

  • Ascending
  • Descending

Show Ads in Visual Composer Add-on

If you are not familiar with building a page by VC, read How to Use Content Blocks first. We consider you read it and know how to edit a page and add a new block to it.

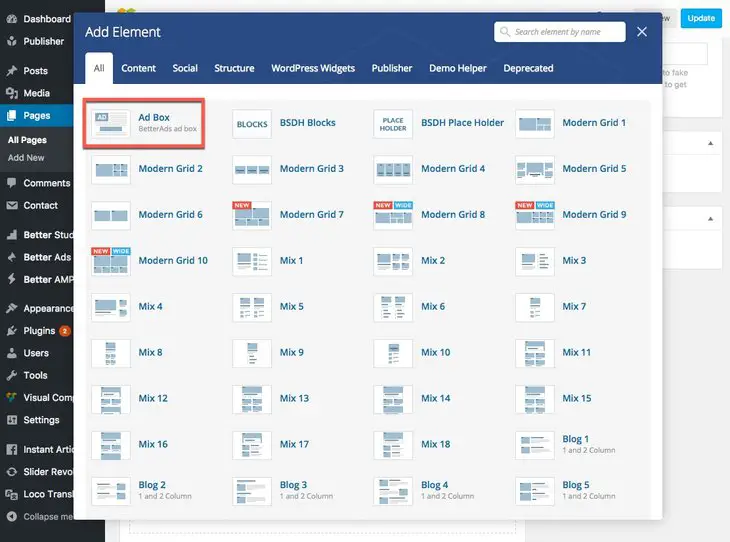
Now edit the page you want and add new add-on to the location you want. Ad Box is Better Ads add-on, select it.

Show Ads in Visual Composer add-on

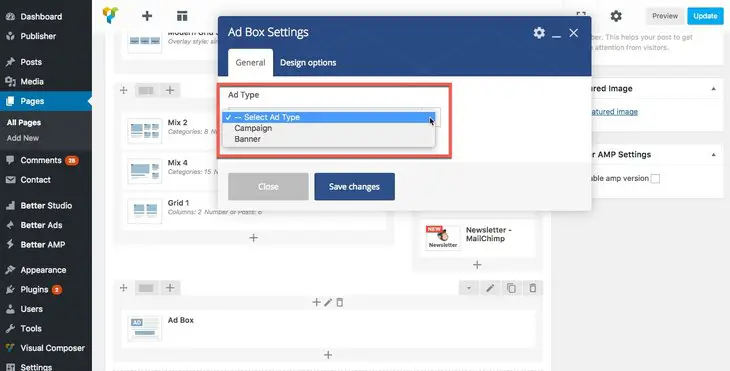
Choose to show a banner or campaign in this block. We described setting of both of them above in this page for widgets; widgets and Visual Composer add-on options are the same.

Better Ads VC add-on options

How to Create Campaign

What is Ad Campaign?

Ad campaign allows you to display several Ads in one Ad location. You can show every Ad in a separate column or show one Ad at a time but with rotation. Group your related Ads in one place and get the best from your Ad location by displaying several Ads (rotationally or at once). It significantly increases your Ad showing performance. Let’s see how we can set it up.

How to Create Ad Campaign?

Go to Better Ads → Campaigns, here you see a list of existing campaigns and also Add New Campaign button at top of the page, click on it.

Create a new campaign in Publisher

1- Enter a name for campaign

2- Write a description for it. It’s just for your guidance and won’t show to website visitors.

3- Click Publish.

It’s done.

Add Banner to Campaign

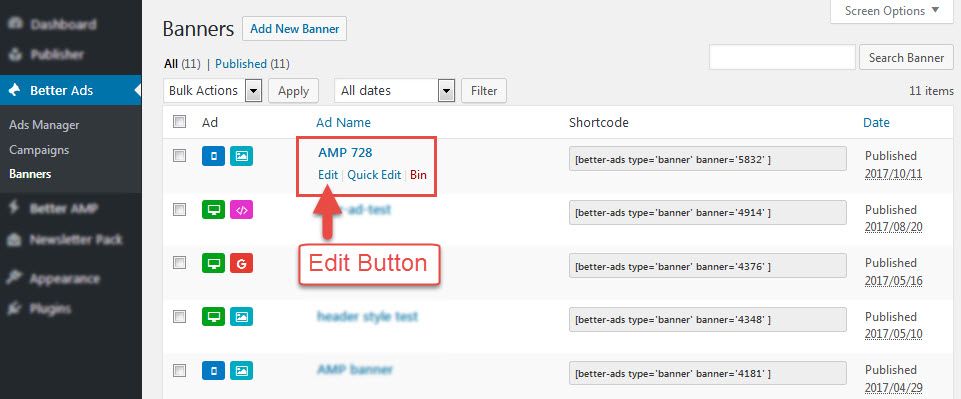
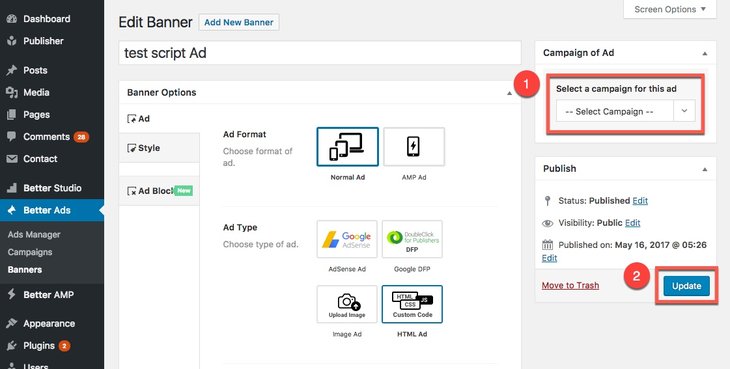
If you have created banners, now you can add them to a campaign. To do this go to Better Ads → Banners, now edit Ads you want one by one and add them to a campaign. Let’s edit one of them.

Add a banner to a campaign in Publisher

Select one of the campaigns in Campaign of Ad and click Update.

Banner added to a campaign in Publisher

Add as many as Ads you want to one campaign but you can manage how many of them display in every Ad location; wherever you want to use it, you see an option for number of displaying Ads. Find more information about these options in How to Show Ads in Ad Location and How to Show Ads in Widgets.

How to Create Banner

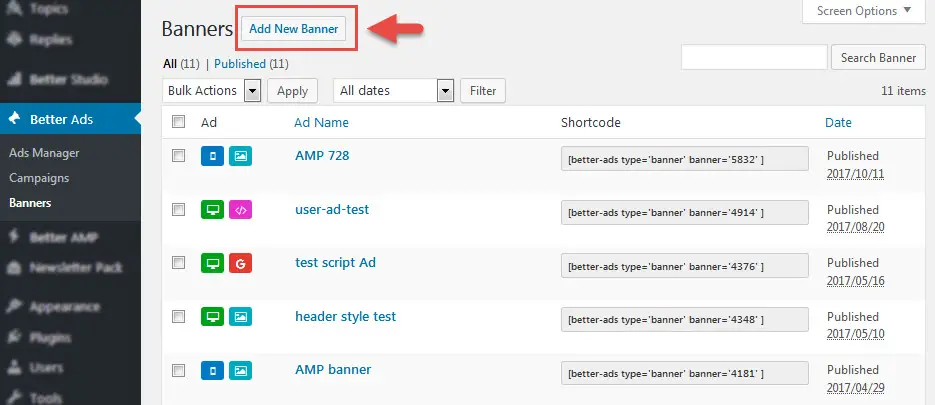
First of all, you should create a banner for your advertisement, then select a location for displaying it or add it to a campaign. For adding a new banner go to Better Ads → Banners, now click on Add New Banner at the top of the page.

Create a new banner in Better Ads Manger plugin

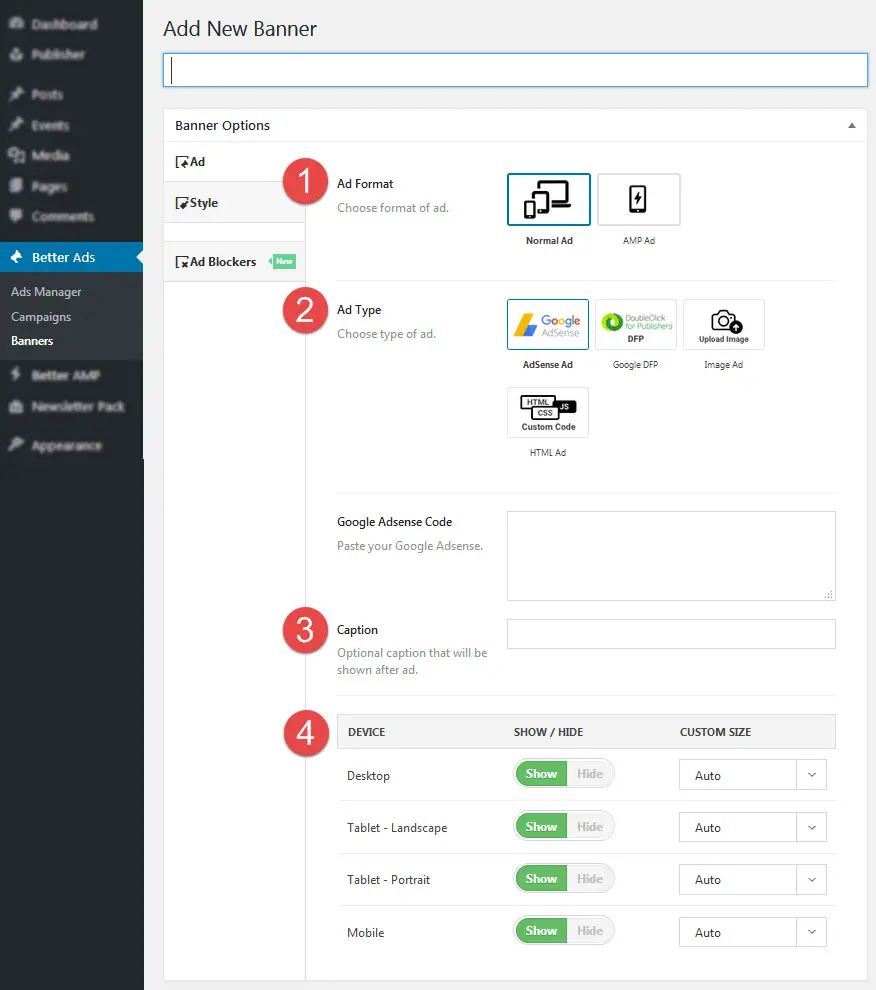
Now you see below page, we describe options one by one. Begin with Ad tab.

Ad:

Ad tab in Better Ads Manager

1- Ad Format: There are 2 type of ads.

  • Normal Ad: Show Ad in normal mode (not AMP pages)
  • AMP Ad: Display this banner just in AMP pages

Keep in mind adding an Ad as AMP Ad, makes it just available for AMP Ad Locations. In the same way, adding an Ad as Normal Ad, makes it just available for Normal Ad Locations.

2- Ad Type: Four Ad types which have major use, are supported by Better Ads Manager Plugin (read Different Ad Types).

3- Caption: Optional caption for showing after ad.

4- Device: If you chose Normal Ad, you see a list of responsive fields that you can use them to show/hide Ad in different devices.

Now let’s see what’s in next tab Style.

Style:

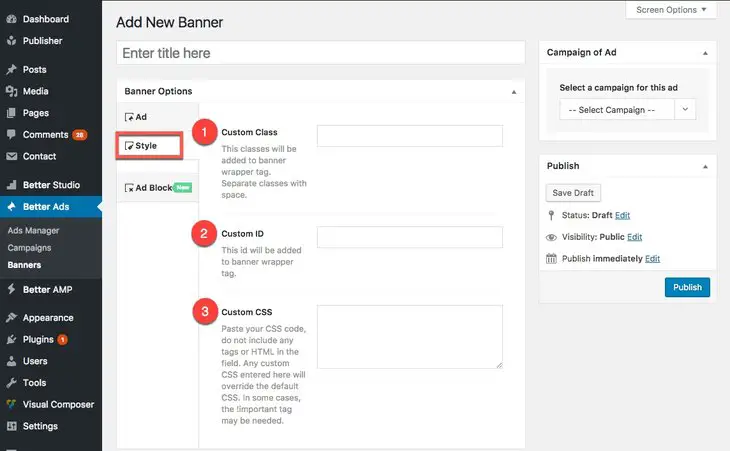
Style setting in Better Ads Manager

1- Custom Class: These classes will be added to banner wrapper tag. Separate classes with space.

2- Custom ID: This id will be added to banner wrapper tag.

3- Custom CSS: Paste your CSS code. Do not include any tags or HTML in this field. Any custom CSS entered here overrides the default CSS. In some cases, the !important tag may be needed.

Normal Ad or AMP Ad

AMP (Accelerate Mobile Page) has tons of rules! (see ampproject documentation). Because of that, displaying Ad in AMP pages is not the same thing as displaying them in normal pages. You need to create completely different banner (also campaign) for displaying Ad in AMP view. You can use the same Ad codes for both normal and AMP pages but in different banners.

Different Ad Types

How to Create Google Adsense Ad

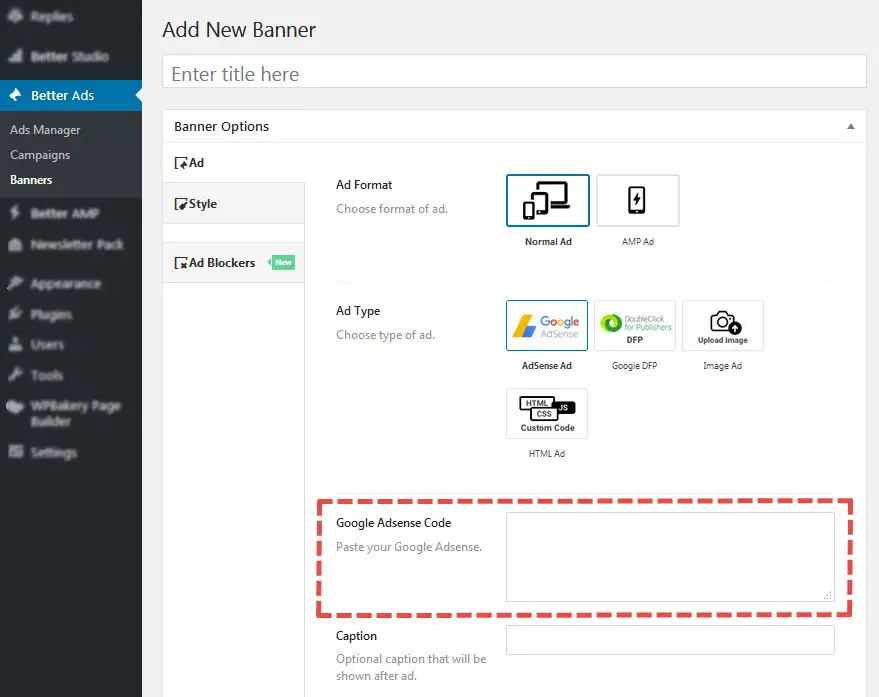
Google Ads, most important Ad system we find on Internet nowadays. First create your adsense account (you need a Gmail for that), then grab your Google Adsense Codes from there and paste it in Google Adsense Code (see below image).

Google Adsense Ads in Better Ads Manager

How to Create Google DFP

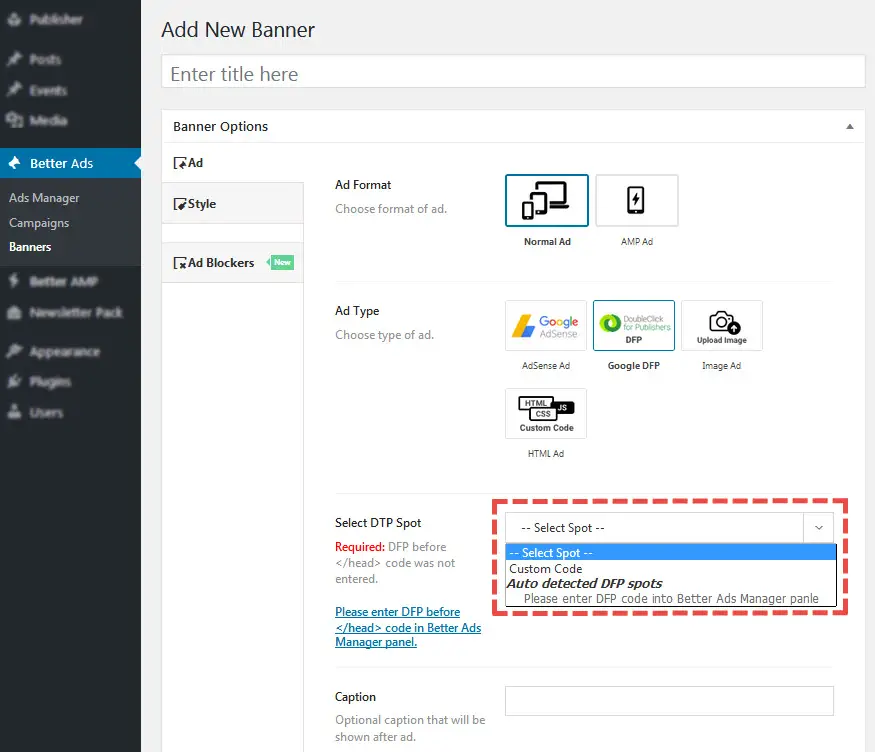
It is another Google advertisement system (see DoubleClick for Publishers for more information) supported by Publisher. Like Google Adsense, create an account and grab Google DFP codes. There is a little difference here; for pasting this code you should go to Better Ads → Ads Manager → Google DFP, paste it in DFP Before </head> Code field.

Now let’s get back to our Banner. You see a drop-down menu, Select DFP SpotDFP is not responsive so you need to select one size for displaying Ads.
Google DFP Ads in Better Ads Manager

You can use custom codes for DFP or just autodetect and let’s Google decides about Ad size.

How to Create Image Ad

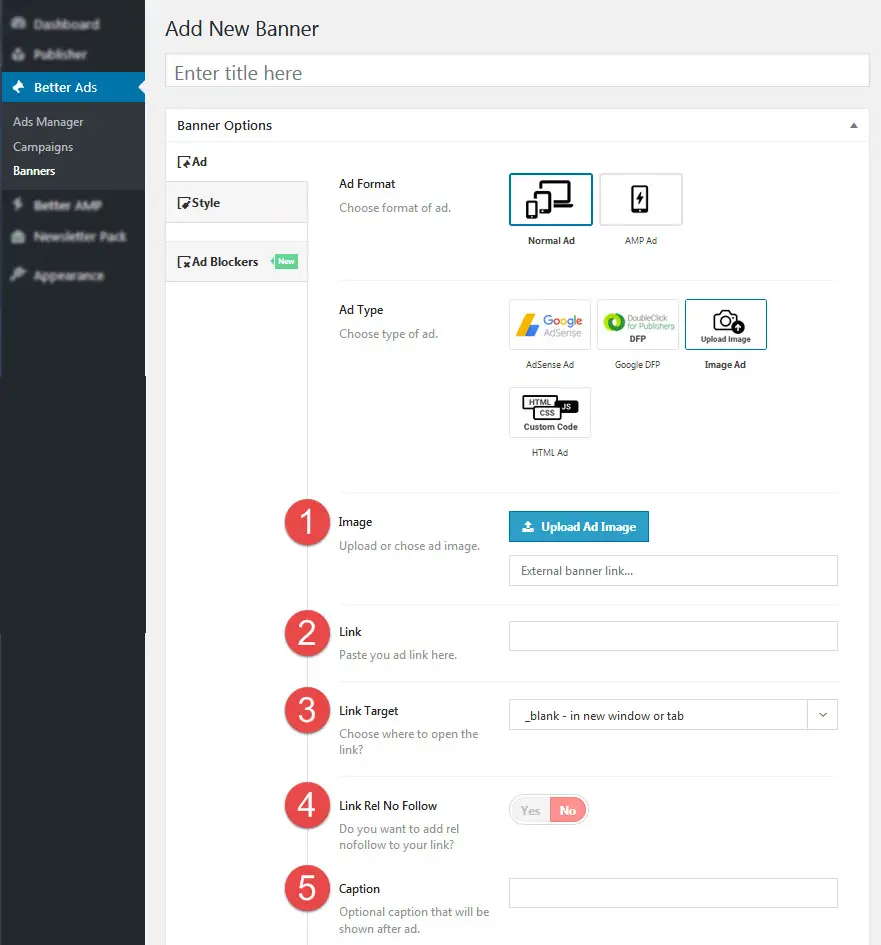
Use an image (jpeg, gif, png, etc) for showing your Ad and link it to destination page. Image could be uploaded locally or link from URL.

Add image Ad in Better Ads Manager

1- Image: Upload an image from your device or enter an URL link for it.

2- Link: Paste your destination page URL.

3- Link Target: Choose where to open the link. For example select _blank to open it in new tab or window.

4- Caption: Enter an optional caption for this Ad. This caption displays underneath the image.

5- Link Rel No Follow: You can add nofollow rel to this link.

How to Create HTML Ad

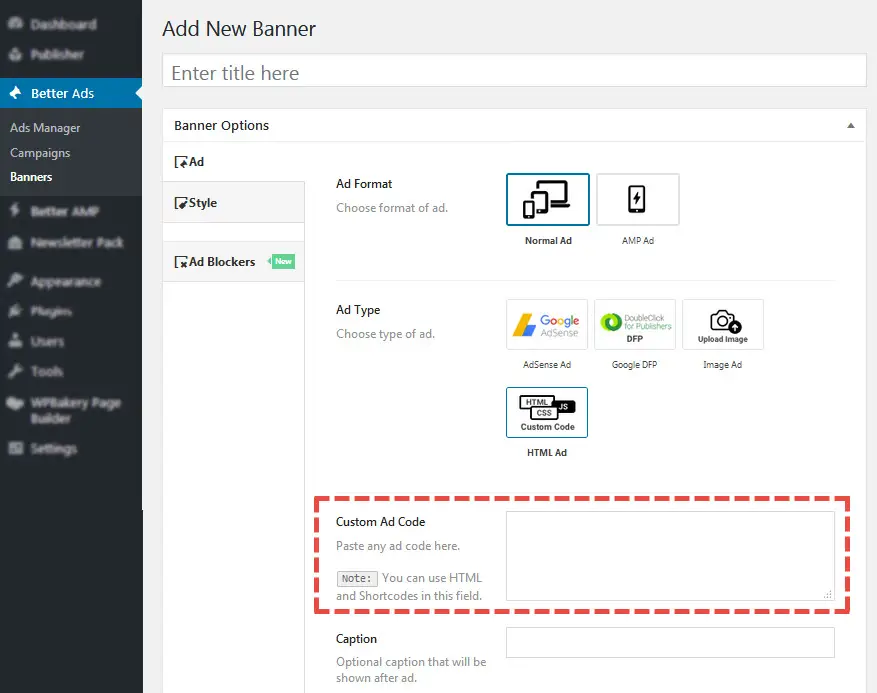
Use a custom code which may contain HTML, CSS and JavaScript codes. Shortcodes can be used too. Paste Ad code in Custom Ad Code field (see below image).

HTML Ads in Better Ads Manager

How to Create AdBlocker Ad

Ad Blockers feature make it possible to display Ads even on browsers with active Ad Blocker. First Better Ads tries to send normal Ad, if it fails, tries to send another Ad which should be appropriate in a way that Ad Blockers do not detect it as an Ad (however more sophisticated practice is sending an image which asks user to turn Ad Blocker off).

Ads for Ad Blockers in Better Ads Manager
1- Fallback Type: Choose type of fallback for Ad. When Ad blocker detected on visitor browser, a fallback request will be received by website.

If you choose HTML Code:

2- Custom HTML Code (not shown in the image): Paste your custom HTML code. Yo can add css code also within <style></style> tags. Remember don’t use your main Ad code here, because Ad Blocker had found and blocked it.

If you choose Image:

2- Fallback Image: Upload or choose fallback image for ad.

3- Caption: Optional caption for image. This caption displays beneath the image.

4- Link: Paste you Ad link here.

5- Link Target: Choose where to open the link.

6- Link Rel No Follow: Do you want to add rel nofollow to your link? then select Yes.

Now you are familiar with all options. Most important parts are Ad Format & Ad Type, we described them in details.

Final Step

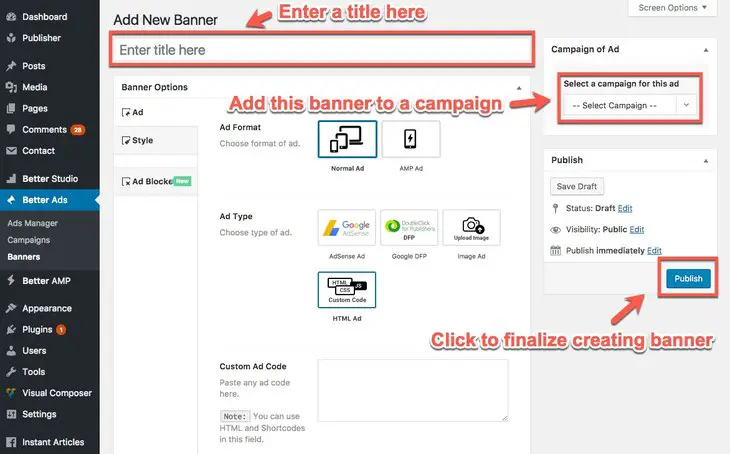
Ok well done! your Ad just need a name, enter it in the field at the top of page (image below) then click on Publish button.

Finalize creating a banner in Better Ads Manager

Your banner is ready for displaying, just one thing remains; if you want to use this Ad in a campaign, select the campaign here. For this purpose, you should create a campaign first. If you don’t have any campaign, don’t worry, build one then edit this banner and add it to the campaign.