publisher sidebars

Sticky Sidebar

What is Sticky Sidebar?

Let’s say you have a 500px high sidebar and your page height is 2000px, what happens if you scroll the page 1000px? Yes there would be no sidebar and just a blank space at side of the page. By activating Sticky Sidebar, your sidebars become intelligent, stick to the page and never leave it! Scroll through Publisher Demo and observe sidebars behavior.

How to Activate Sticky Sidebar?

Go to Publisher → Theme Options → General → General → Sticky Sidebar, click on the drop-down menu and select Enable.

Activating Sticky Sidebar in Publisher

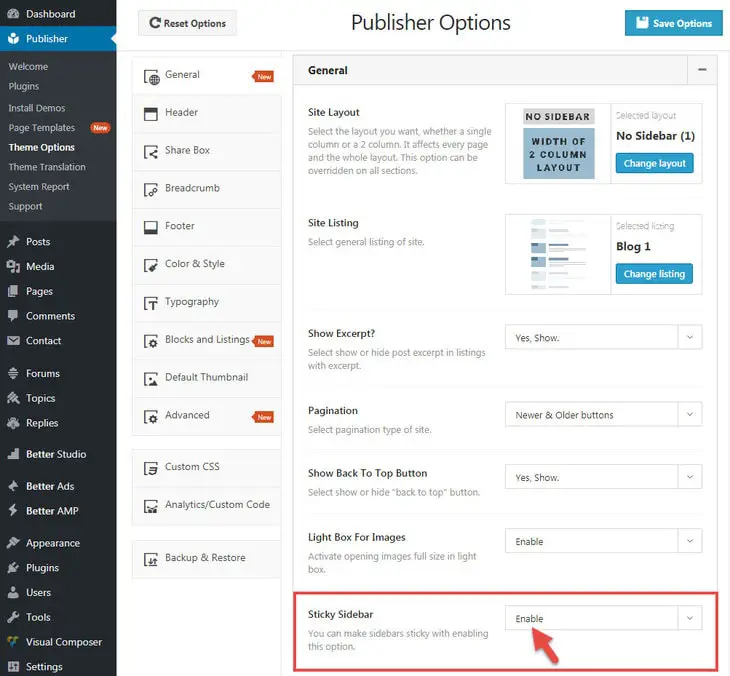
Click Save Options and you are done, sidebars are sticky now.

Sticky Columns in Visual Composer

For adding this feature to Visual Composer columns, click on edit icon in top of columns and in opened popup add sticky-column class to the Extra class name field and save changes.

Sticky sidebar for Visual Composer columns in Publisher
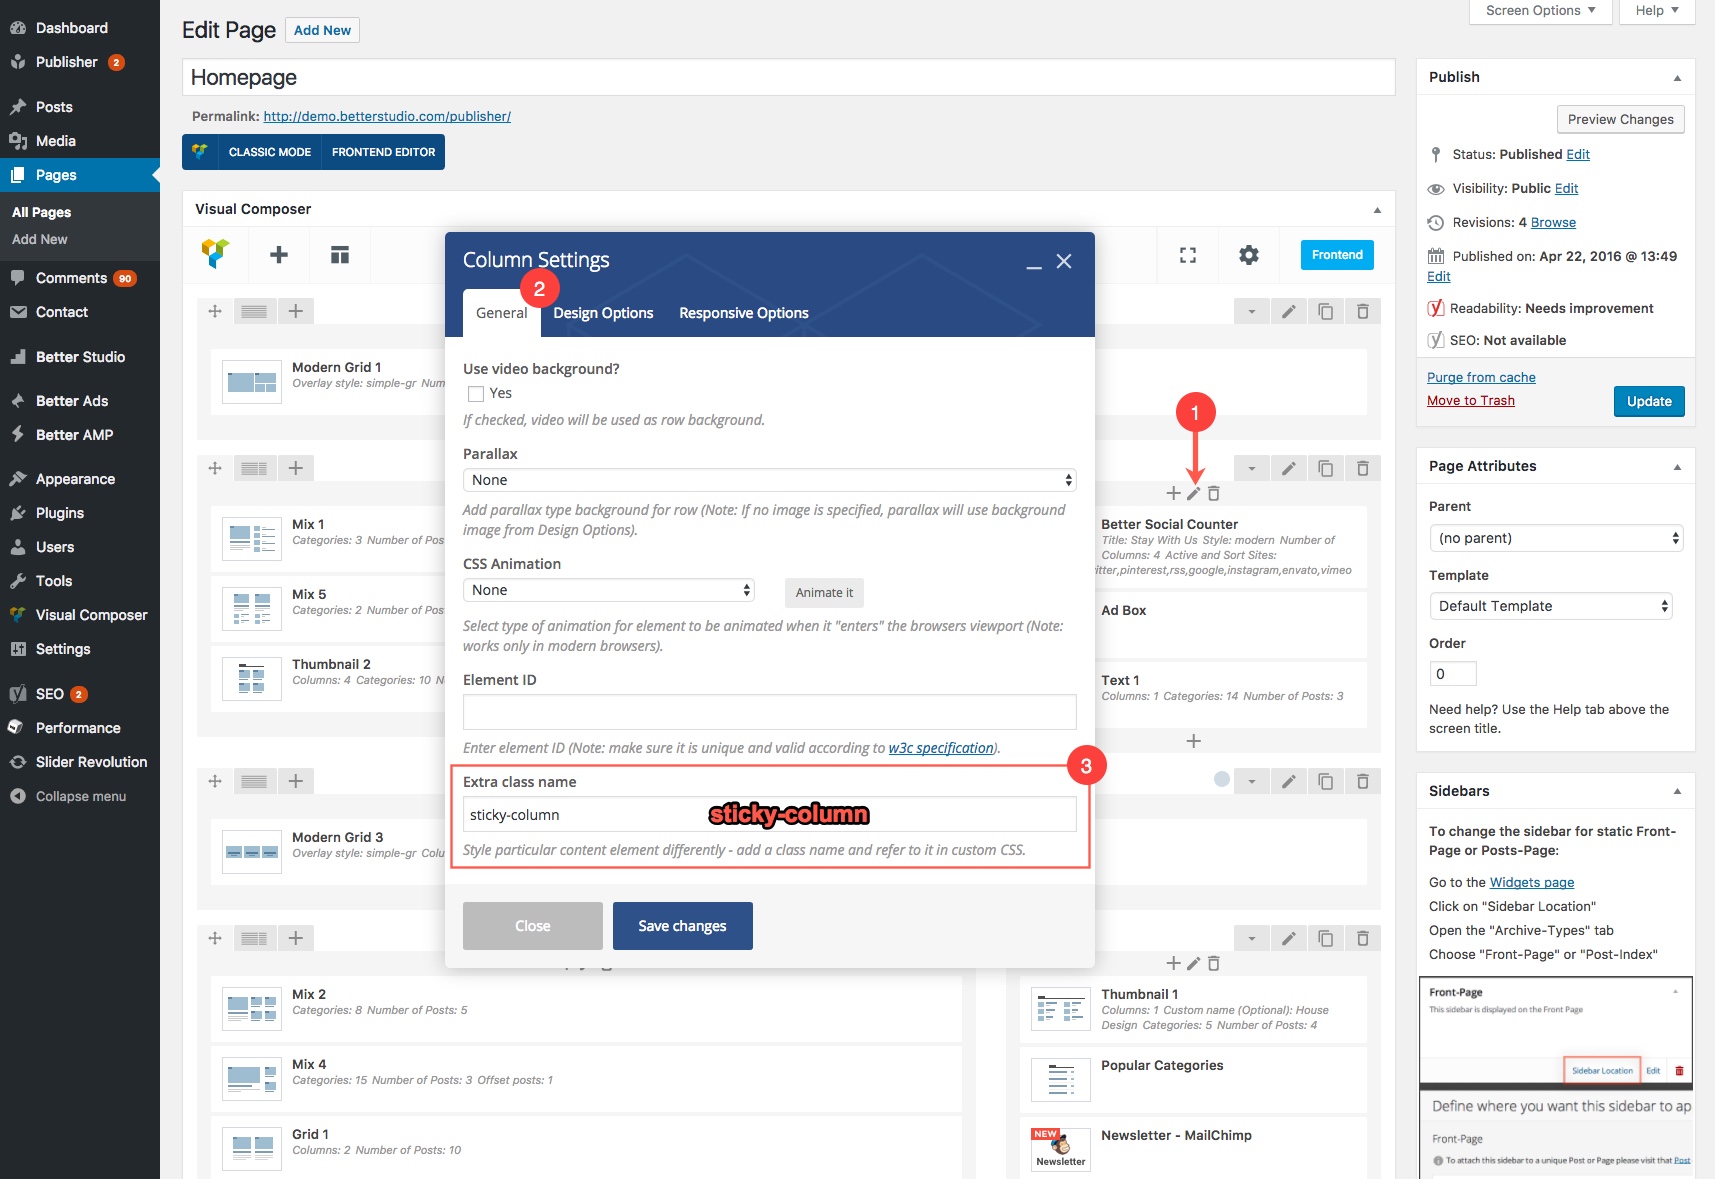
NOTE: Be careful when your make Visual Composer blocks sticky; Sticky is for sidebars, if you make main content block sticky, it may interfere with other elements.

Caution: Do not use Google Adsense in sticky blocks. If Google knows about it, your website gets penalty; the penalty could be banning your website from Google Ads system. Decreasing your organic search percent might be another consequence (not confirmed). Generally, make sure your ad system is OK with using ads in sticky blocks. Otherwise, do not use ads in sticky blocks.

Custom Sidebars

When we talk about custom sidebars, it has two meanings:

  1. Add custom sidebars to Publisher theme.
  2. “Custom Sidebars” plugin for customizing post pages sidebars.

You can create as many as custom sidebars you want in Publisher and use them in different pages.

“Custom Sidebars” plugin is fully compatible with Publisher. Its task is to customize sidebars appearing on every single post you want (any post type – read more about post types post types).

Now we first describe how to create custom sidebars in Publisher then describe how to manage sidebars in different pages by “Visual Composer” and “Custom Sidebars” plugins.

How to Create Custom Sidebar?

Make sure Custom Sidebar plugin is activated on your website. First of all you should create a sidebar. But how? in this part we teach you how to create a sidebar and in the next part we introduce Publisher exclusive widgets.

Go to Appearance → Widgets.

Custom sidebars page in Publisher

First we describe what you will find here:

  1. Available Widgets: These are widgets you can select for your sidebar. There are 35 exclusive widgets for Publisher.
  2. Create a new sidebar: Use this button to create a new sidebar (we will describe it).
  3. Import/Export Sidebars: You can take a backup of your sidebars or restore backups created before.
  4. Custom Sidebars: These are sidebars made by user, could be deleted or add more of them.
  5. Theme Sidebars: These are default sidebars of Publisher. It’s obvious where they belong to. Primary sidebar is used in 2 column layout and both Primary Sidebar & Secondary Sidebar are used in 3 column layout (Read more about layouts).  There are four widget locations in footer (Read more about footer options).

Ok get back to create a new sidebar.

1- Click on Create a new sidebar (see above image).

2- Enter a name for sidebar in Name field. Enter a description in Description field.

Enter a name and description for sidebar in Publisher

Finish it by clicking on Create Sidebar. Now you have a new empty sidebar.

In above image you see a checkbox, Advanced – Edit custom wrapper code, it’s advanced options for sidebar. If you don’t have enough information about it, just leave it. Let’s check this checkbox:

Advanced options for creating sidebar in Publisher

Before-after title-widget properties define the HTML code that will wrap the widgets and their titles in the sidebars. More info about custom wrapper code. Do not use these fields if you are not sure what they do, it can break the design of your site. Leave these fields blank to use the theme sidebars design.

How to Add a New Widget to Sidebar

We created a new sidebar in above and will use it here, but the procedure is the same for all new or existing sidebars also for Custom and Primary sidebars.

1- Now you should add widget(s) to your empty sidebar. On the left-side you see the list of available widgets; 35 exclusive widgets for Publisher. Click on the widget you want.

Select a sidebar for widget in Publisher

A list of all sidebars will show up. Select the sidebar you want to add this widget to. Click Add Widget.

2- Now your widget is added. Open its accordion menu and customize it.

A new widget added to new sidebar in Publisher

Publisher Exclusive Widgets

As mentioned above, Publisher has 35 exclusive widgets, use them in Custom and Primary Sidebars or use them by Visual Composer. If you want to display weather or your social count or show special posts in various layouts and styles, probably there is an option (or options) suits your need. Because they are too many, we dedicated a section to Publisher Custom Widgets for introducing and describing them.

How to Use “Custom Sidebars” Plugin?

First of all go to Publisher → Plugins and install Custom Sidebars (if you didn’t install it before). After that you have created custom sidebars or organized your primary ones, you can select which sidebar to show up in different sidebar locations in Publisher. There are 6 locations you can select from:

Primary Sidebar: Shown when at least 2 column layout with sidebar show selected (read more about column layout)

Secondary Sidebar: Shown when 3 column layout with two sidebar show selected

Footer – Column1 & 2 & 3 & 4: Shown in Footer widget locations (Read more about footer options).

Now make sure your Custom Sidebars plugin is active and updated to the latest version, then stay with us; we are going to describe the procedure of using this plugin step by step:

For Any Post Type:

1- Edit the post you want to customize its sidebars. All post types are included i.e post, page, attachment, etc.

2- On the right-hand-side of the editing page you see Custom Sidebars meta box.

Use Custom Sidebars plugin in Publisher

Six locations of Publisher sidebars are shown, but remember displaying sidebars depends on which layout and setting you use for your site (or overridden settings for this post).

3- Below the sidebar location you want to change its content, click on drop down menu.

Select a sidebar for custom sidebar in Publisher

4- You see a full list of Custom and Primary sidebars in Publisher. Select the sidebar you want. You’re done and this sidebar location is customized (do not forget to update the post). Do the same procedure for every sidebar location you want.

For Any Archive Page:

1- Go to Appearance → Widgets

2- Go to sidebar you want to use in particular archive page. At the bottom of its accordion, click on Sidebar Location

Change sidebar location

3- Open For Archives accordion. Here you select an archive page for displaying this sidebar.

Show sidebar in archive pages

Change Widget Visibility

You can set roles for showing one widget; for example show it just in specific pages or for specific users. To do this, when Custom Sidebar plugin is active, you see a button below Global Options, Visibility.

Change visibility of widget in sidebar

Click on it and add a new rule to it. You see it is possible to show this widget for specific roles, specific pages, post types and taxonomies.

change visibility of a widget

2 & 3 Column Sidebar

Publisher has 2 & 3 Columns layout which could be overridden in different pages (custom pages, posts, etc). That means for every page you can select a different page layout. When you choose two column layout, there is a main content column and a sidebar column. When you choose three column layout, there is a main content column and two sidebars.

You can select a general layout for all pages of your website then override it for every individual pages. Let’s get started with changing layouts.

How to Change Layouts?

We talked about option panel before and described some of its options (see option panel); Now we want to talk about selecting layouts for different pages.

1- Go to Publisher → Theme Options → General. Marked items (image below) have an option to select layout.

Pages that have layout setting option in Publisher

We don’t write for each one of them individually because changing layout for all of them is basically the same procedure. We just describe which pages are affected by these items and also give an example:

General: This is default layout for all pages of website if other items are set to Default.

Post: Default layout for posts page.

Page: Default layout for pages (page post type; read more about post-types).

Attachment Page: Default layout for attachment pages.

Homepage (non-static): Default layout for non-static Homepage.

Category: Default layout for category archive pages.

Tag: Default layout for tag archive pages.

Author: Default layout for author archive pages.

Search Page: Default layout for search results page.

WooCommerce – Shop: Default layout for WooCommerce pages.

bbPress – Forums: Default layout for bbPress forum pages.

As an example, we select one of them and change its layout. Rest of them have the same procedure.

2- Click on + in front of Posts to open the accordion.

Changing layout of posts in Publisher

You see Posts Page Layout, click on Change layout.

3- There is modal opened and you see the list of all available layouts. In below image similar layouts are marked by the same color.

Different layouts for posts in Publisher

A: Use the layout you have selected in Publisher → Theme Options → General → General.

B: No sidebar but it uses the width of two column layout (read Change Site Size).

C: No sidebar but it uses the width of three column layout (read Change Site Size).

D: Two column layouts.

E: Three column layouts.

How to Change Columns Width?

Read Change Site Size + Columns Gap for complete information about resizing website and columns width.

Can I Have Different Sidebar Layouts for Different Pages/Posts?

Yes, we went through details of selecting layouts in this section. You can override layout of all categories, posts, etc, or override it for every single of them. For example if we want to change layout of one category (not all categories).

1- Go to Posts → Categories, edit the category you want to change.

Change layout of a single post in Publisher

2- Here you can see Page Layout, click on Change layout and change the layout as described in How to Change Layouts? Now layout of just this category is changed.

You can do the same for single posts and pages, including bbPress & WooCommerce pages.

You can use different layouts for different pages in Publisher. For every layout its own sizing will be accounted. For example your homepage is three column layout with total width of 1300px, and posts use two column layout with total width 0f 1200px. Now your website homepage looks different from posts page.