What are Category & Tag?
Category & tag are predefined taxonomies in WordPress. Read more about taxonomy in WordPress blog.
Use categories to order your posts based on their general topic. For example create and select “Car” category for contents related to cars. Also it is possible to create “child” or “sub-” category for another category (parent category); for example create “Self Driving” as a child-category for parent-category “Car”.
So about tags, tag every post with important words or phrases. So you can track and show all posts with the same tag, not only you can do it but also Google knows these tags and their archive pages.
Now we want to know about options Publisher gives us for categories and tags.
Category Archive Page
In category archive page you can see all the posts belong to corresponding category. This page has its own setting. First we talk about universal archive page settings for all categories but it’s possible to override these settings for every single category.
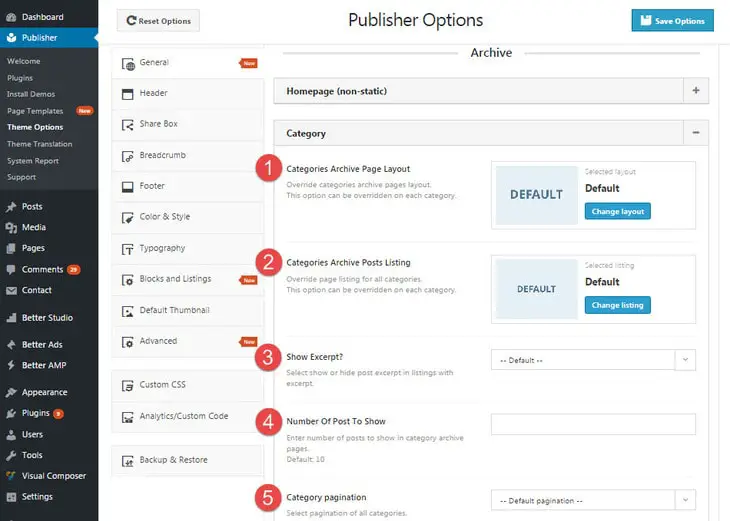
Now go to Publisher → Theme Options → General → Archive → Category, here you can find category archive page options.
1- Category Archive Page Layout: Select a layout for category archive pages.
2- Categories Archive Posts Listing: Select a listing for displaying posts in archive page.
3- Show Excerpt: Show/hide post excerpt.
4- Number of Post to Show: Select number of posts in one page.
5- Category Pagination: Select pagination for all categories archive page.
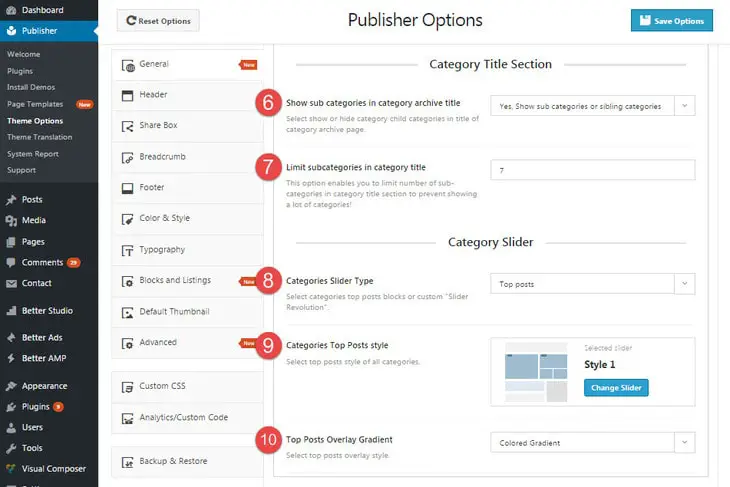
6- Show Sub-categories in Category Archive Title: Show/hide child-categories in category archive page title.
7- Limit Sub-categories in Category Title: Limit the number of sub-categories showing up in category archive page title (option 6).
8- Categories Slider Type: Select a type for displaying category top posts. It has 3 options:
- Disabled: Do not show top posts.
- Top Posts: Show top posts without slider. Style of these posts can be selected in options 1 & 2.
- Slider Revolution: Select one slider created by Slider Revolution plugin for displaying top posts. Select this slider in option number 11.
9- Category Top Posts Style: Select style for displaying category top posts. This works if you select “Top Posts” in above option.
10- Overlay Gradient: Select top post items overlay style.
11- Categories Top Slider Revolution: (not shown in above image) This option works if you select “Slider Revolution” in option number 1. Select a “Slider Revolution” slider for top of categories. Remember create a slider in Slider Revolution plugin first then you can see it here.
How to Create a Category?
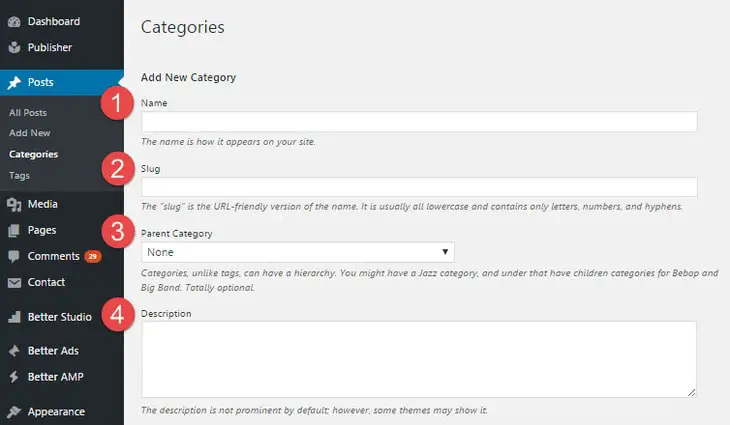
For creating a new category go to Posts → Category, now everything is ready for creating a new category.
Public Options
There are options which belongs to WordPress and you can find them in all themes.
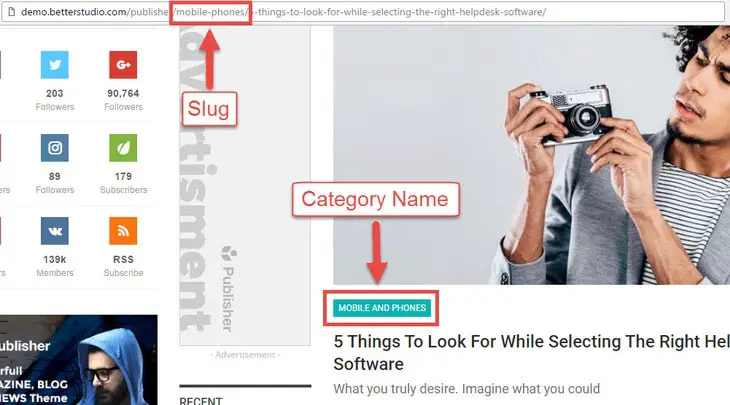
1- Name: Select a name for your category. This could show up for visitors.
2- Slug: The “slug” is the URL-friendly version of the name. It is usually all lowercase and contains only letters, numbers, and hyphens. If you choose to display category in permalink, the slug shown in page URL. Also it is visible in category archive page URL.
3- Parent Category: Categories, unlike tags, can have a hierarchy. You might have a “Jazz” category, and under that have children categories for “Bebop” and “Big Band”. Totally optional.
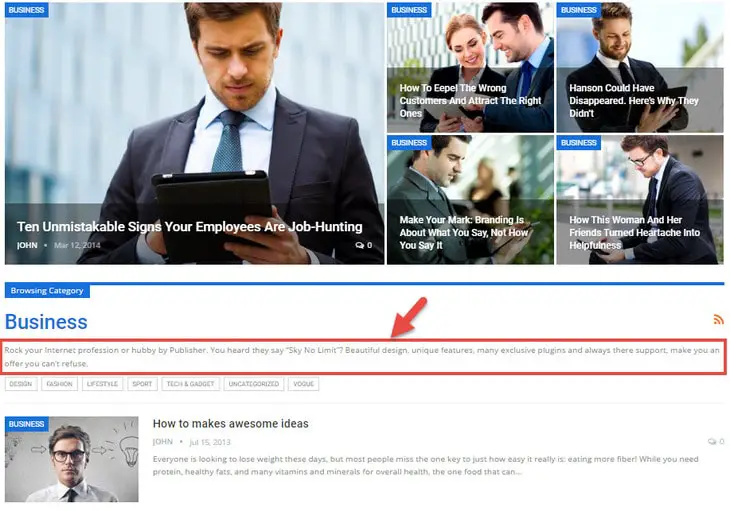
4- Description: The description is not prominent by default; Publisher shows it in category archive page.
Now you are done with public options of WordPress categories. Let’s see what options Publisher has for categories.
Publisher Exclusive Options
Better Category Options meta box is exclusive for Publisher. You can leave its settings to default and create your category, later you can come back and edit.
Start with Style tab.
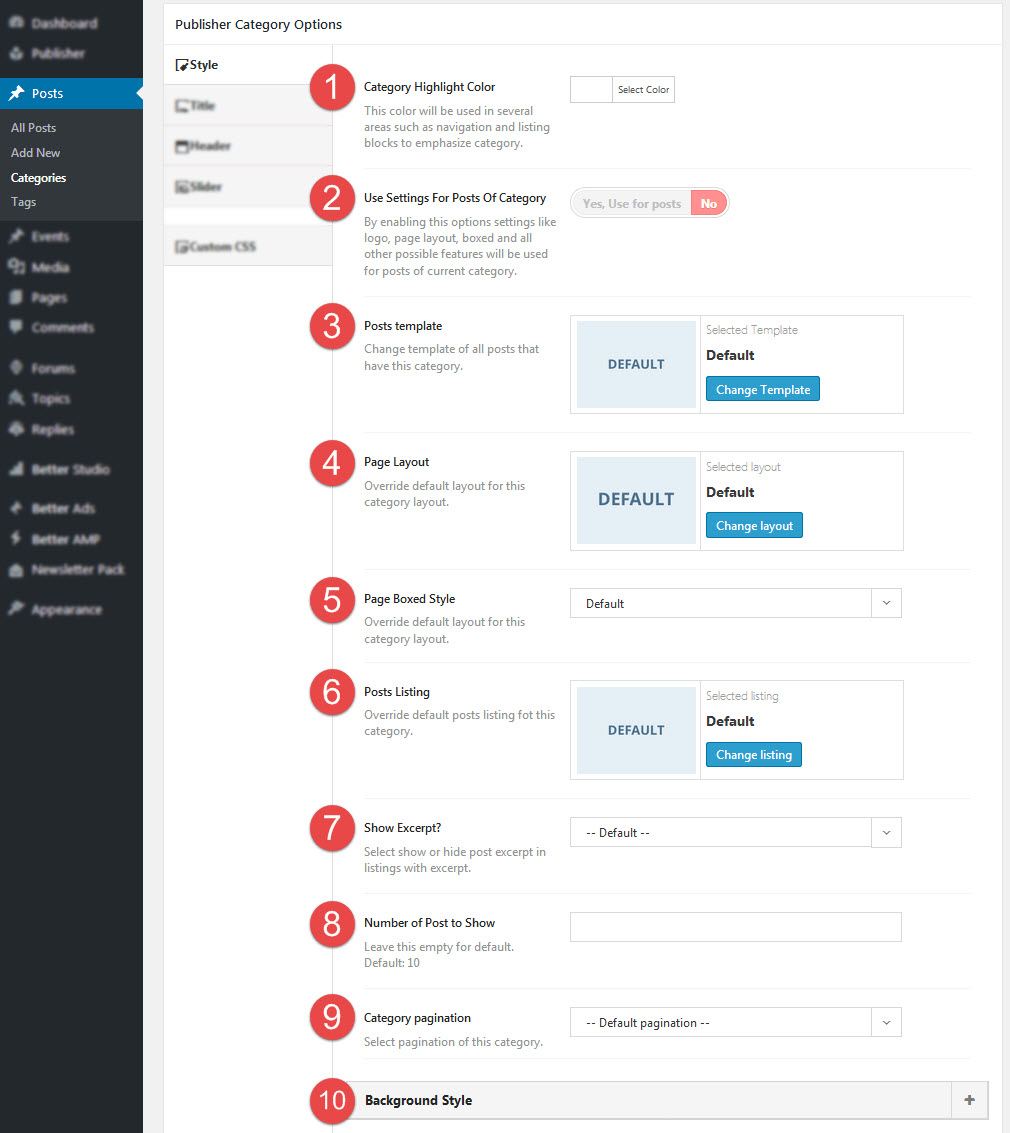
Except the first option, “Category Highlight Color”, all of these are just for category archive page. This settings override category archive page default settings.
1- Category Highlight Color: Wherever this category name shows up, this color will used for.
2- Use Settings for Posts of Category: By enabling this options settings like logo, page layout, boxed and all other possible features will be used for posts of current category.
3- Post Template: Change template of all posts that have this category.
4- Page layout: Select a layout for this category archive page.
5- Page Boxed Style: Select a style for this category archive page. We talked about differences of them in Header Layout section.
6- Posts Listing: Select a listing for displaying posts of category in archive page.
7- Show Excerpt: Show/hide excerpt of posts.
8- Number of Posts to Show: If left empty, default is 10.
9- Category Pagination: Select pagination of this category.
10- Background Style: Select color and image for background for category archive page.
Now take a look at Title tab.
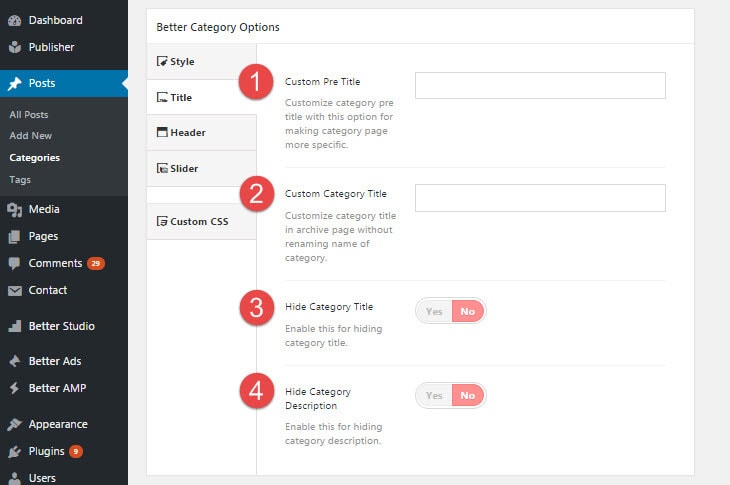
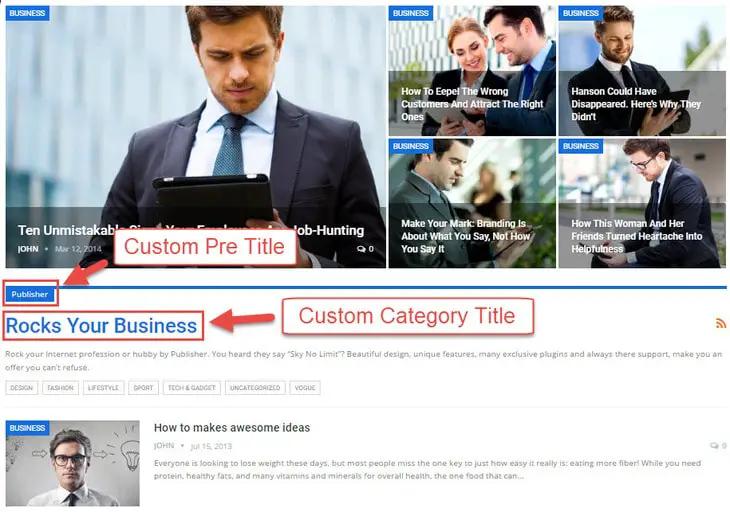
1- Custom Pre Title: Customize category pre title with this option for making category page more specific.
2- Custom Category Title: Customize category title in archive page without renaming category (above image).
3- Hide Category Title: Show/hide category title.
4- Hide Category Description: Show/hide category description.
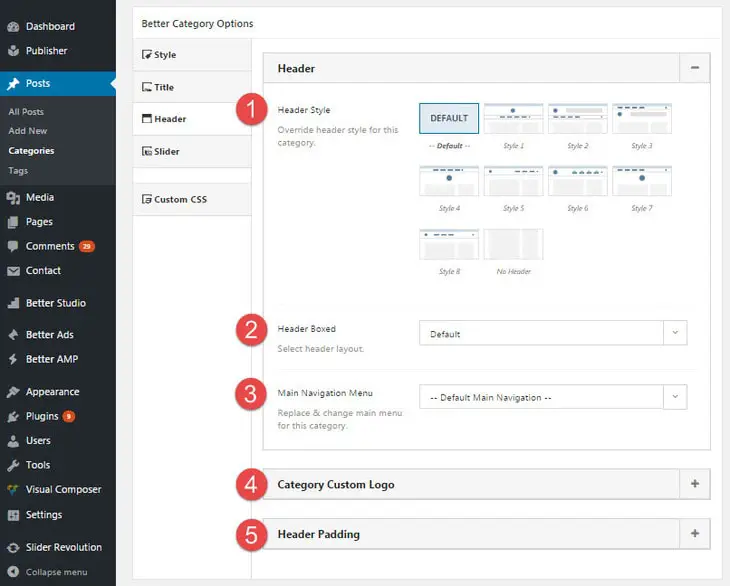
The third tab is Header.
1- Header Style: Choose style for header of this category archive page.
2- Header Boxed: Select header box.
3- Main Navigation Menu: Override the menu you have selected for main menu for this category archive page.
4- Category Custom Logo: Select custom logo for this category archive page. There are options for selecting regular logo and Retina logo. Notice these logos is just for archive page and posts of this category do not use these logos.
5- Header Padding: Assign padding for top & bottom of category header. Just enter a plain number and it counts as pixel (i.e enter 20 for 20px padding). Please note this option does not work for Header 5, 6 and 8.
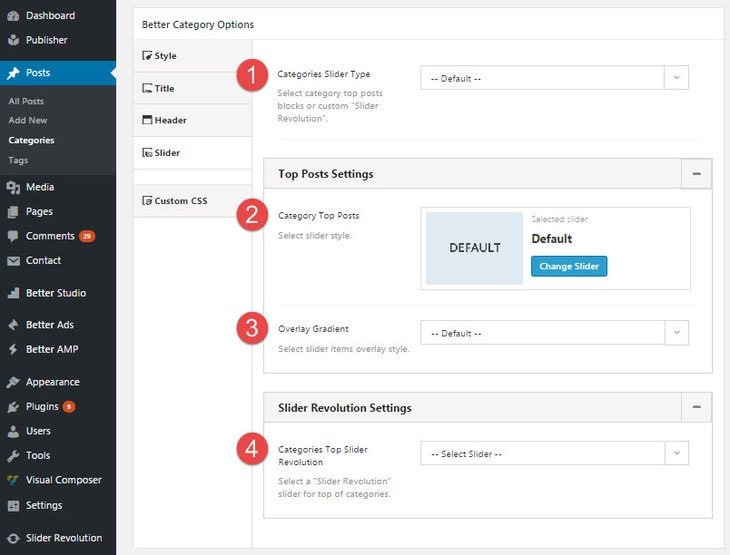
Next tab, Slider, is just for top posts of category archive page.
1- Categories Slider Type: Select a type for displaying category top posts. It has 4 options:
- Default: Use default setting for category archive pages.
- Disabled: Do not show top posts.
- Top Posts: Show top posts without slider. Style of these posts can be selected in options 2 & 3.
- Slider Revolution: Select one slider created by Slider Revolution plugin for displaying top posts. Select this slider in option number 4.
Despite its name, “Category Slider Type”, just option number 4 is a real slider.
2- Category Top Posts: Select style for displaying category top posts. This works if you select “Top Posts” in above option.
3- Overlay Gradient: Select top post items overlay style.
4- Categories Top Slider Revolution: Select a “Slider Revolution” slider for top posts of category. This option works if you select “Slider Revolution” in option number 1. Remember you should create a slider in Slider Revolution plugin first then you can see it here.
Final tab is Custom CSS; using this is similar to Custom CSS & Class in Publisher option panel.
Tag Archive Page
In tag archive page you can see all the posts belong to corresponding tag. This page has its own settings. First we talk about universal archive page settings for all tags but it’s possible to override these settings for every single tag.
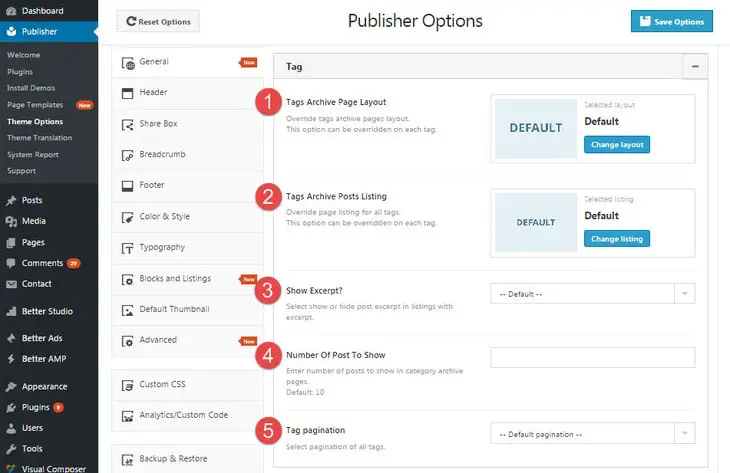
Now go to Publisher → Theme Options → General → Archive → Tag, here you can find tag archive page options.
1- Tag Archive Page Layout: Select a layout for tag archive pages.
2- Tag Archive Posts Listing: Select a listing for displaying posts in archive page.
3- Show Excerpt: Show/hide post excerpt.
4- Number of Post to Show: Select number of posts in one page.
5- Tag Pagination: Select pagination for all tags archive page.
How to Create a Tag?
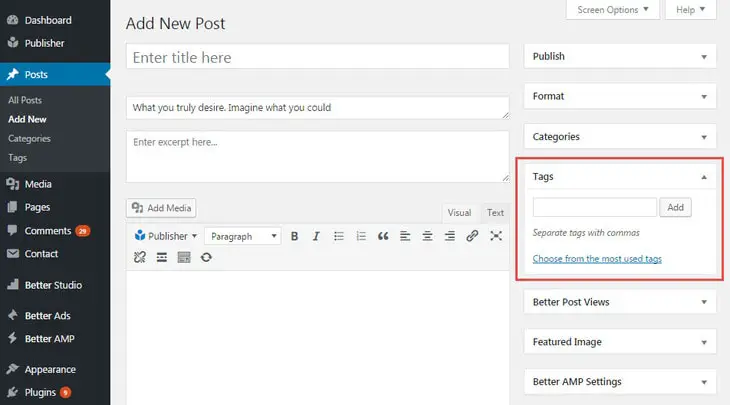
Tag has two differences with category; it’s not hierarchical (i.e child tag doesn’t exist) and it can be created by just typing a name in “Tags” meta box in posts. So there are two methods for creating a new tag. First, just type a name in Tags meta box in post editing page.
The tag created here uses default options for tag in Publisher but you can edit them. For this purpose go to Posts → Tags, now edit the tag you want. For more information about options here, keep reading second method for creating tags.
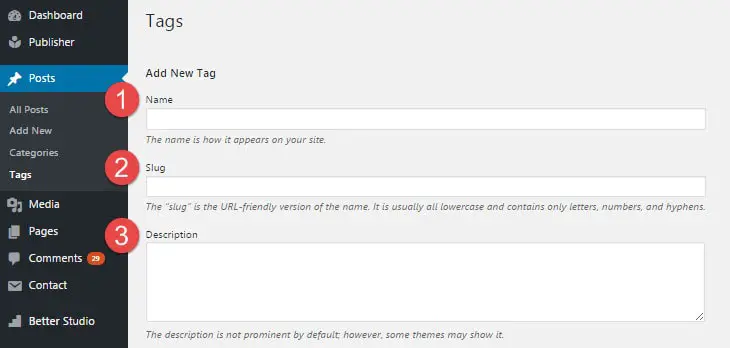
Second method for creating a new tag is as follow. Go to Posts → Tags, now everything is ready for creating a new tag.
Public Options
There are options which belong to WordPress and you can find them in all themes.
1- Name: Select a name for your tag. This could show up for visitors.
2- Slug: The “slug” is the URL-friendly version of the name. It is usually all lowercase and contains only letters, numbers, and hyphens. If you choose to display tag in permalink, the slug shown in page URL. Also it is visible in tag archive page URL.
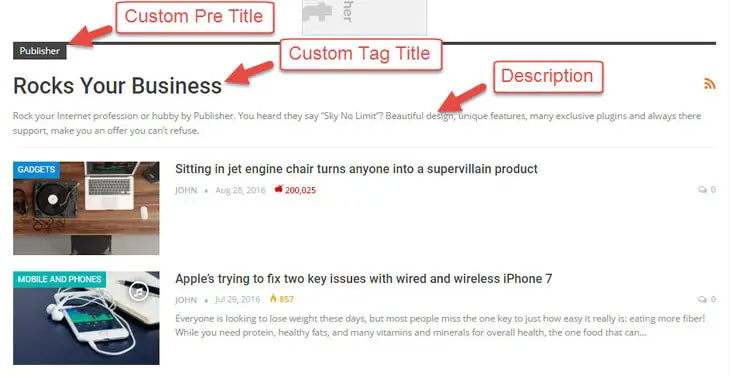
3- Description: The description is not prominent by default; Publisher shows it in tag archive page title.
Now you are done with public options of WordPress tag. Let’s see what options Publisher has for tag.
Publisher Exclusive Options
Better Tag Options meta box is Publisher exclusive options for tags. You can leave them to default and create your tag (which happens when you create a tag in post editor page), later you can come back and edit them.
Start with Style tab.
These options are all for tag archive page. Posts with this tag do not get effected. These settings override default settings of tag archive pages in theme option panel.
1- Page layout: Select a layout for this tag archive page.
2- Posts Listing: Select a listing for displaying posts of tag in archive page.
3- Show Excerpt: Show/hide excerpt of posts.
4- Number of Posts to Show: If left empty, default is 10.
5- Tag Pagination: Select pagination of this tag.
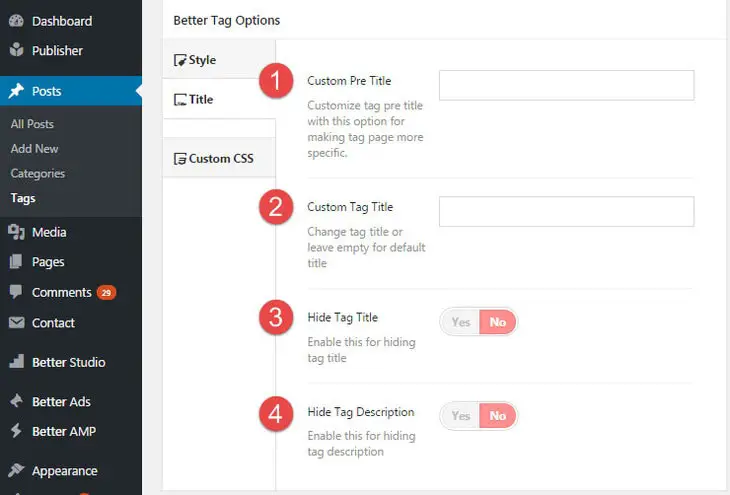
Now take a look at Title tab.
1- Custom Pre Title: Customize tag pre title with this option for making tag page more specific.
2- Custom Tag Title: Customize tag title in archive page without renaming tag (above image).
3- Hide Tag Title: Show/hide tag title.
4- Hide Tag Description: Show/hide tag description.
Final tab is Custom CSS; using this is similar to Custom CSS & Class in Publisher option panel.

