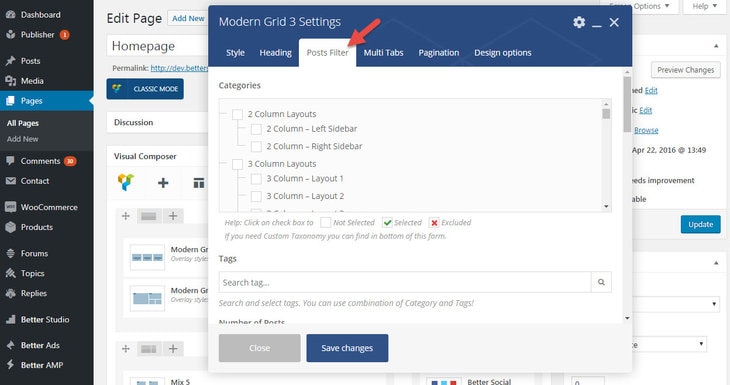
Post Filter
When you add a new content block as described in previous section, a modal shows up with some tabs. The most important one is Post Filter. Keep reading to know how to customize contents of this new block.
1- Categories: Select categories or sub-categories you want to show (green check) or which ones you want to hide (red cross). If no category is marked, all of them will be considered as selected.
2- Tags: Select tags you want to show. Combination of tags and categories are allowed (rules describe in options number 14, 15 and 16 on this page)
3- Number of Posts: Select how many posts you want to show in this block. If the field left empty, automatically selects the number from WordPress Setting → Reading.
4- Post ID filter: If you want to show some specific posts in this block, enter post IDs here separated by commas (ex: 10,27,233). If you want to exclude some posts from this block, enter their IDs here with “-” (ex: -7,-16). To find IDs read How to Find Post, Category or Tag ID.
5- Offset posts: Start the count with an offset. If you have a block that shows 4 posts before this one, you can make it starts from the 5’th post (by using offset 4).
6- Only Posts With Featured Image? Select on then just posts with featured image show up.
7- Remove Sticky Posts? By enabling this, sticky posts wouldn’t be sticky anymore in this block. They just show in ordinary order.
8- Post Author ID filter: Enter IDs of authors you want to show their posts. Separate IDs by comma (ex: 10,27,233). Exclude one or some authors from this block by entering “-” before ID(s) (ex: -7,-16).
9- Disable Duplicate Posts Removal: By enabling this option, duplicate posts removal feature will be disabled only for this block.
10- Time Filter: Select among posts published in specific period (Today Posts, Today + Yesterday Posts, This Week Posts, This Month Posts, This Year Posts).
11- Order: Select order of showing posts (Descending, Ascending)
12- Order By: Select a factor to order posts by. Options are: Published Date, Modified Date, Random, Number of Comments, Title, Popular, 7 Days Popular.
Custom Post type and Taxonomy
13- Custom Post Type: Enter post type IDs separated by commas ( ex: book,movie,product ). With this option you can add, for example, WooCommerce products to your content block.
14- Custom Taxonomy: Enter custom taxonomies with “taxonomy:term_id” pattern, also you can separate multiple taxonomies with commas. ( ex: genre:200,genre:212,writer:120 ). “Category” & “Tag” are two taxonomies supported by default; if you have another taxonomies, enter their name with “term_id”. Finding “term_id” is similar to finding tags and categories IDs.
Query Conditions
15- Between Cats & Tags: Set a relation between tags and categories. If you choose And (both Cats & Tags) all Cats and Tags selected in options 1 & 2 should be included in the post. By choosing OR (One or more cat/tag), it’s enough for the post to just obey Cats rule (option 15) or Tags rule (option 16).
16- Between Cats: Set a relation between categories. If you choose And (All Cats) all Cats selected in option 1 should be included in the post. By choosing OR (One or more cat), it’s enough for the post to just include one of them.
17- Between Tags: Set a relation between tags. If you choose And (All Tags) all Tags selected in option 2 should be included in the post. By choosing OR (One or more tag), it’s enough for the post to just include one of them.

